17 Small Appliance Storage Ideas That Finally Clear Kitchen Counters

This post contains affiliate links, and we will be compensated if you buy after clicking on our links. Read our disclaimer.
Read our editorial process
If your kitchen countertops are cluttered with toasters, blenders, coffee makers, and air fryers, you’re not alone. Many of us are working with limited space, and when small appliances take over the kitchen, it can feel like there’s no room left to cook let alone enjoy your space.
Luckily, with a little creativity and the right organizational tools, you can reclaim your counters and make every square inch work harder.
Whether you’re a fan of clean, minimalist kitchens or you love the warmth of rustic charm, these 17 small appliance storage ideas will help you keep your kitchen looking tidy, stylish, and functional.
Let’s dive into the first ten creative and practical solutions for storing your small appliances.
1. Appliance Garage Cabinet

An appliance garage sits on the countertop beneath upper cabinets, using a door or tambour cover to hide your toaster, blender, or coffee maker. The appliances stay plugged in. You open the cover, use what you need, and close it back up.
In low-light kitchens, finish choice matters more than expected. Matte black absorbs light and makes a small corner feel heavier. Warm wood tones or light painted finishes keep the space from feeling boxed in.
Size it to fit two or three appliances only. Go wider than that, and it starts to dominate the counter. When sized right, it disappears into the cabinetry, and the kitchen feels open even with the door shut.
2. Pull-Out Cabinet Drawers

Deep lower cabinets are where appliances go to get forgotten. Pull-out drawers fix that by sliding out on smooth tracks, bringing your slow cooker, air fryer, or rice cooker fully into reach without digging or awkward lifting.
In narrow kitchens, full-extension tracks matter most. A drawer that only opens halfway still forces you to reach in. Full-extension hardware lets the whole tray come out, which is the difference between actually using the system and avoiding it.
Use one drawer for appliances and a second for cords and attachments. Keeping them separate sounds minor, but it stops the drawer from turning into a tangle you dread opening.
3. Rolling Kitchen Cart with Storage
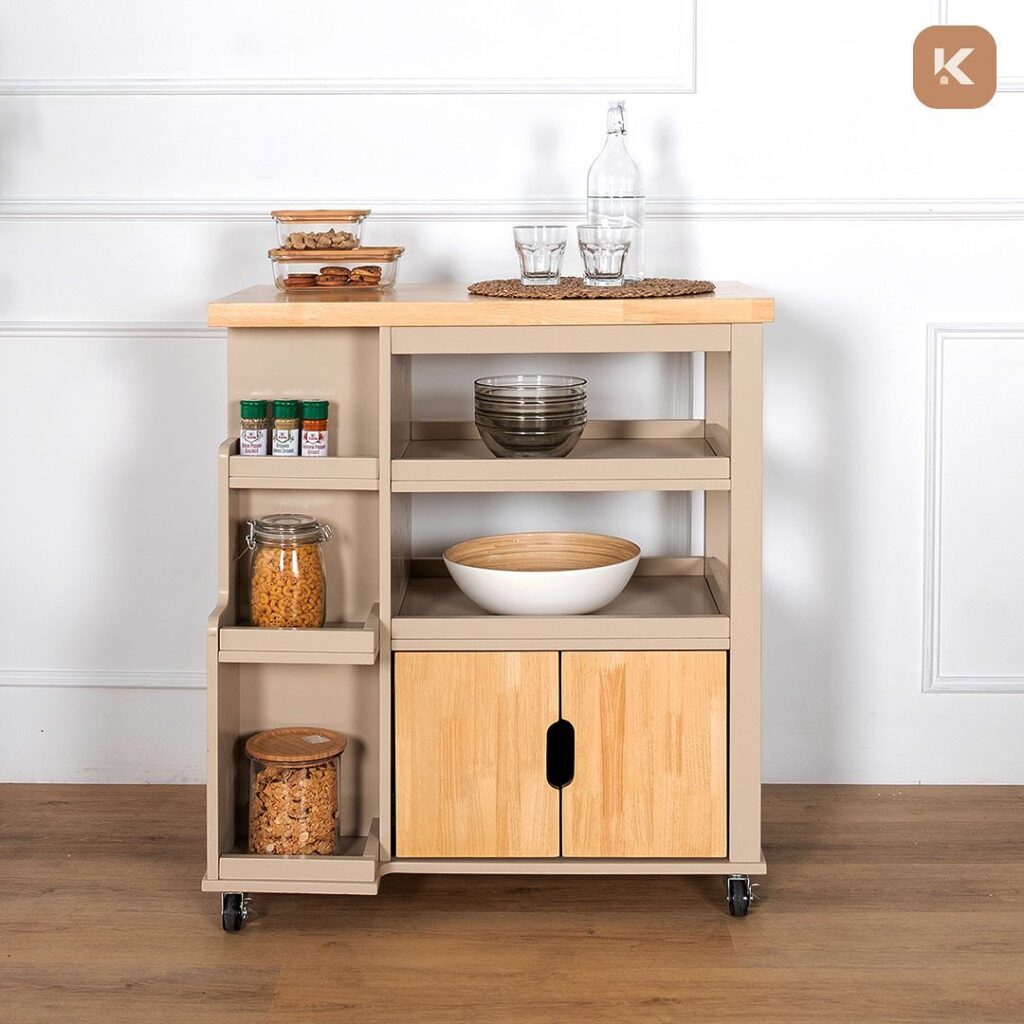
A rolling cart gives you flexible appliance storage without touching a single wall or cabinet. It can hold a microwave, toaster oven, or coffee setup on top, with shelves or closed drawers below for everything else.
On uneven or older tile floors, wheel quality makes a real difference. Cheap casters wobble and resist rolling. Locking rubber wheels keep the cart stable when you’re using it and mobile when you need to shift it out of the way.
Match the cart’s finish to your existing cabinetry, not your appliances. Stainless steel carts in a warm wood kitchen tend to look like an afterthought. A finish that reads as intentional makes the cart feel like part of the room, not a workaround.
4. Lazy Susan Corner Cabinet

Corner cabinets waste more space than almost any other spot in the kitchen. A Lazy Susan turns that dead zone into usable storage by letting you spin appliances like an Instant Pot or food processor into reach instead of fishing around in the back.
In deep base cabinets, a tiered Lazy Susan works better than a single-level one. A flat shelf still buries items behind each other. Two tiers let you see everything at once and reach it without moving anything out of the way first.
Soft-close mechanisms are worth the extra cost. Without them, heavier appliances cause the shelf to spin past where you want it. A model with a gentle stop keeps things in place and prevents items from sliding or tipping mid-rotation.
5. Appliance Lift Cabinet

A lift cabinet uses a spring-loaded mechanism inside a lower cabinet to raise a heavy appliance, like a stand mixer, up to counter height. You pull a lever, it rises, you use it, and it drops back down out of sight.
For bakers who use their mixer several times a week, this removes real physical strain. Lifting a 20-plus-pound mixer from a low shelf repeatedly adds up. The lift handles that entirely and keeps the appliance at the right working height from the start.
Have an outlet installed inside the cabinet during setup. Running a cord out from under a closed door looks unfinished and creates a tripping hazard. An interior outlet keeps everything contained and the counter reading clean.
6. Over-the-Fridge Cabinet Storage

The space above the refrigerator gets ignored in most kitchens, but it holds more than people expect. A cabinet installed there works well for appliances you use occasionally waffle makers, bread machines, deep fryers things worth keeping but not worth counter space.
Standard 8-foot ceilings make this spot harder to reach than it looks. Use labeled bins inside so you’re not guessing what’s where before climbing a step stool. Retrieval needs to be quick, or the space quietly stops getting used.
Weight matters more at this height than anywhere else in the kitchen. Heavy appliances pulled down from above shift your balance fast. Reserve this spot for lighter, bulkier pieces and keep the heavier items stored lower.
7. Built-In Pantry with Appliance Station

A pantry with a dedicated appliance section keeps everything contained without touching the counters. Deep shelves, built-in outlets, and a closing door turn it into a functional station for a coffee setup, blender, or espresso machine all plugged in and ready.
Glass doors with interior lighting change how this area reads from across the room. Without them, even a well-organized station can look like a stuffed closet. Backlighting adds depth and signals that the space was planned, not just filled.
Cord management inside the pantry is where most setups fall apart. Appliances sharing an outlet strip with loose cords create both a safety issue and visual clutter. Cable clips or a small cord box keep the interior looking as deliberate as the exterior.
8. Tall Cabinet with Pull-Out Shelves
A tall pantry-style cabinet fitted with pull-out shelves stacks multiple appliances vertically without expanding your floor footprint. Each shelf slides out independently, so your air fryer, kettle, and blender each get their own dedicated level.
Door clearance is the detail that galley kitchen owners miss most often. A tall cabinet placed too close to an island or opposing counter may not open fully, which defeats the pull-out function entirely. Measure the swing radius before committing to a placement.
One appliance per shelf, no doubling up. Stacking or crowding a pull-out shelf strains the track over time and means moving one thing to reach another. That friction is usually what turns a good storage system into one people stop using.
9. Floating Shelves for Decorative Storage
Floating shelves work for appliances that look good enough to leave visible a vintage toaster, a clean-lined espresso machine, and a designer kettle. They stay accessible without a cabinet door between you and them.
Stud spacing doesn’t always cooperate with where you want the shelf to go. French cleats or heavy-duty anchors rated for the actual appliance weight are a safer choice than standard brackets, especially once cords and accessories add to the load.
Cords are what ruin this look most often, and they’re easy to plan for upfront. Cable clips mounted along the underside of each shelf route cords cleanly. Leaving them loose and dealing with it later rarely works out.
10. Under-Bench Storage in Breakfast Nook
Built-in bench seating with lift-up lids or drawers underneath turns a casual nook into functional appliance storage. A popcorn maker, electric griddle, or mini chopper fits easily below out of sight but close enough to grab without leaving the room.
Sealed bench cavities with no airflow trap humidity faster than most people expect. Appliances stored in that environment can develop musty smells over time. An anti-scratch liner on the base and occasional airing out prevent both problems.
Hinge quality on lift-up seats is easy to overlook during planning. A heavy lid with weak hinges won’t stay open while you reach inside, which gets frustrating quickly. Soft-lift or stay-open hardware costs a little more and makes the storage genuinely usable day to day.
11. Hidden Toe-Kick Drawer Storage

The strip of space beneath your base cabinets looks like trim, but it can function as a shallow pull-out drawer. Hand mixers, immersion blenders, and electric can openers fit there cleanly, completely out of sight until you need them.
Kitchens with dark or busy flooring make these drawers nearly invisible when closed which is the point. The challenge is keeping the interior clean since floor-level storage collects dust faster than any other spot. Appliance bags or soft padding protect your items and make wiping the drawer out much easier.
Soft-close hardware is worth adding from the start. A toe-kick drawer that rattles or requires a firm push to close feels cheap regardless of how well everything else is finished. The mechanism is inexpensive and makes a quiet but noticeable difference.
12. Hanging Cabinet Shelf Inserts

Most cabinets waste the vertical space between shelves. Hanging inserts a hook onto the existing shelf above and creates a second level below it, giving smaller appliances like a milk frother, sandwich press, or portable blender their own spot without adding any hardware to the cabinet itself.
Deep cabinets benefit most from this setup, but only if the insert doesn’t block taller items stored nearby. Measure the clearance before buying. An insert that forces you to rearrange everything around it creates more work than it solves.
Chrome finishes show fingerprints and grease faster than wood or coated wire options. For a cabinet you open daily, a matte or natural finish stays looking cleaner between wipes and holds up better over time.
13. Slide-Out Appliance Tray

Heavy countertop appliances, such as stand mixers and coffee machines, are constantly dragged across the surface, which scratches both the appliance base and the counter underneath. A slide-out tray sits beneath the appliance and lets you pull it forward smoothly instead.
Laminate and tile countertops show drag marks faster than stone surfaces. On those materials, even a rubber-footed appliance causes visible wear over time. A tray with a smooth-glide base eliminates that and keeps the counter looking newer longer.
Models with built-in stoppers are the better choice over basic rolling trays. Without a stopper, the tray can slide too far and tip the appliance forward when you reach for it. A small detail, but one that matters when the item weighs fifteen or twenty pounds.
14. Wall-Mounted Appliance Shelving
Mounting shelves directly to the wall creates a vertical appliance station near your prep or cooking area without using a single inch of counter or cabinet space. A coffee grinder, compact air fryer, or electric kettle all sit at eye level and within easy reach.
Tile walls complicate installation more than most people plan for. Standard wall anchors don’t grip tile reliably, and drilling through it without the right bit risks cracking. Toggle bolts or specialty tile anchors are the correct solution, not the standard hardware that comes in most shelf kits.
Adding hooks or a magnetic strip underneath the shelf keeps accessories from cluttering the surface above. Mixer attachments, cables, and small tools hang neatly below and stay connected to the appliance they belong to, which cuts down on searching every time you cook.
15. Overhead Pot Rack with Appliance Hooks
A ceiling-mounted rack does more than hold pots. Lightweight appliances with handles hand mixers, immersion blenders hang from S-hooks just as easily and free up both counter and cabinet space at the same time.
Kitchens with ceilings below nine feet make overhead racks feel cramped and intrusive. The rack itself, plus the hanging items below it, needs enough clearance that someone standing beneath it isn’t ducking. Higher ceilings or positioning above an island where foot traffic is minimal solves this.
Support hardware is where people cut corners, and it shows quickly. A rack loaded with cast iron and appliances pulls hard on its mounting points. Ceiling joists, not just drywall anchors, need to carry that weight; anything less and the rack shifts or pulls free over time.
16. Stackable Bins or Crates in Pantry

Stackable bins turn open pantry space into a simple, category-based appliance system. One bin holds baking tools, another coffee essentials, a third smoothie gear. Everything stays grouped, cords and attachments included, so you’re never pulling out the blender and hunting for the lid separately.
Clear plastic bins work well in well-lit pantries but look cluttered under dim or warm lighting. Wood or metal crates read cleaner in lower light and hold their appearance longer between tidying sessions. The bin material affects how organized the space feels day to day, not just when it’s freshly arranged.
Label the front of each bin, not the top. When bins are stacked, top labels become unreadable without pulling everything apart. A front-facing label takes seconds to add and saves the frustration of unstacking three crates to find the waffle iron.
17. Under-Sink Appliance Storage

The cabinet under the sink gets written off in most kitchens, but the space on either side of the plumbing is usable for smaller appliances, vacuum sealers, electric kettles, compact food processors, things accessed occasionally rather than daily.
Moisture is the real risk here, and it varies by how well the sink area is sealed. Even without an active leak, condensation from pipes can build up over time. Waterproof containers or a raised tray with drainage gaps protect appliances from sitting directly on a damp cabinet floor.
Slide-out trays make the biggest difference in this specific spot. Reaching past pipes in a dark cabinet is awkward, regardless of how well things are organized. A tray that pulls the whole group forward removes the guesswork and keeps the storage from feeling like a last resort.
Frequently Asked Questions
What is the best way to store small appliances in a small kitchen?
Focus on vertical space first. Pull-out shelves, tall cabinets, and wall-mounted options free up counter space without requiring a bigger kitchen. Group appliances by how often you use them. Daily-use items stay accessible. Everything else gets stored out of the way.
How do I keep appliance cords from becoming a mess?
Store cords with the appliance, not separately. Velcro straps or zip ties keep each cord coiled and contained. If the appliance lives in a cabinet or bin, tuck the cord inside before closing. Separation is where cord clutter starts.
Can I store appliances under the sink?
Yes, for items you rarely use. Keep them off the cabinet floor using a raised tray or waterproof container. Stay clear of the pipe area and check occasionally for moisture. It works well as secondary storage, not primary.
Are appliance garages worth the cost?
For kitchens used daily, yes. They keep appliances plugged in and accessible without cluttering the counter. The upfront cost is higher than open shelving, but the long-term function justifies it, especially for households that cook frequently.
What appliances should stay on the counter?
Only the ones you use every single day. A coffee maker and toaster are reasonable. Anything used three or fewer times a week is better stored elsewhere. Counter space is too valuable to hold appliances that sit idle most of the time.
How do I store appliances safely without damaging them?
Use padded liners, appliance bags, or soft cloth covers for items stored in drawers or bins. Avoid stacking heavy appliances on top of each other. Keep cords from bending sharply at the plug end, as that is where damage usually starts.
Conclusion
Appliance storage is not really about finding more space. It is about using what you already have more deliberately. Most kitchens have enough room. The problem is that storage gets treated as an afterthought, and appliances end up wherever there is a gap rather than where they actually belong.
The ideas in this list cover a wide range of kitchens and budgets. Some require installation. Others need nothing more than a bin and a label. The right choice depends on how you cook, how often you reach for each appliance, and how much visual calm your kitchen actually needs.
Start with one area. Fix the counter clutter first, or sort the cabinet that frustrates you most. Small appliance storage improves quickly when you stop trying to solve the whole kitchen at once and focus on one problem at a time. That shift alone changes how the space feels to work in every day.
Continue Organizing Every Space
• DIY Garage Organization Ideas
• Desk Organization Ideas
• Entryway Organization Hacks
• Hallway Organization Tips