Painting Bathroom Tile Floor: Easy Steps for a Fresh Look

This post contains affiliate links, and we will be compensated if you buy after clicking on our links. Read our disclaimer.
Read our editorial process
You notice it every day. The floor looks dated, even when it’s clean. And no matter what else you update, the bathroom still feels stuck.
Most people assume fixing tile means ripping everything out. That’s expensive, messy, and easy to put off. So the floor stays the same longer than it should.
The challenge is not the paint. It’s knowing how to do it in a way that actually lasts in a humid, high traffic space. Skip one step, and it shows fast.
The shift is simple. Focus on prep, use the right materials, and apply each layer with patience. When done properly, painted tile can hold up and change how the whole room feels.
Tile Painting Basics
Abrasion & Cleaning
Scrub with TSP degreaser and sand with 120-grit paper. Dull the gloss so the primer can grip.
Bonding Primer
Use a specialty tile primer. This is the glue that prevents peeling in humid bathroom environments.
Epoxy or Latex Floor Paint
Apply two thin coats. Epoxy is more durable for main baths; latex is easier for quick style shifts.
Curing & Sealing
Apply 2-3 coats of polyurethane sealer. Let cure for 48 hours before walking on your new floor.
This guide walks you through exactly how to do it without overcomplicating the process.
First Things First: Is Tile Paint Actually Worth It?
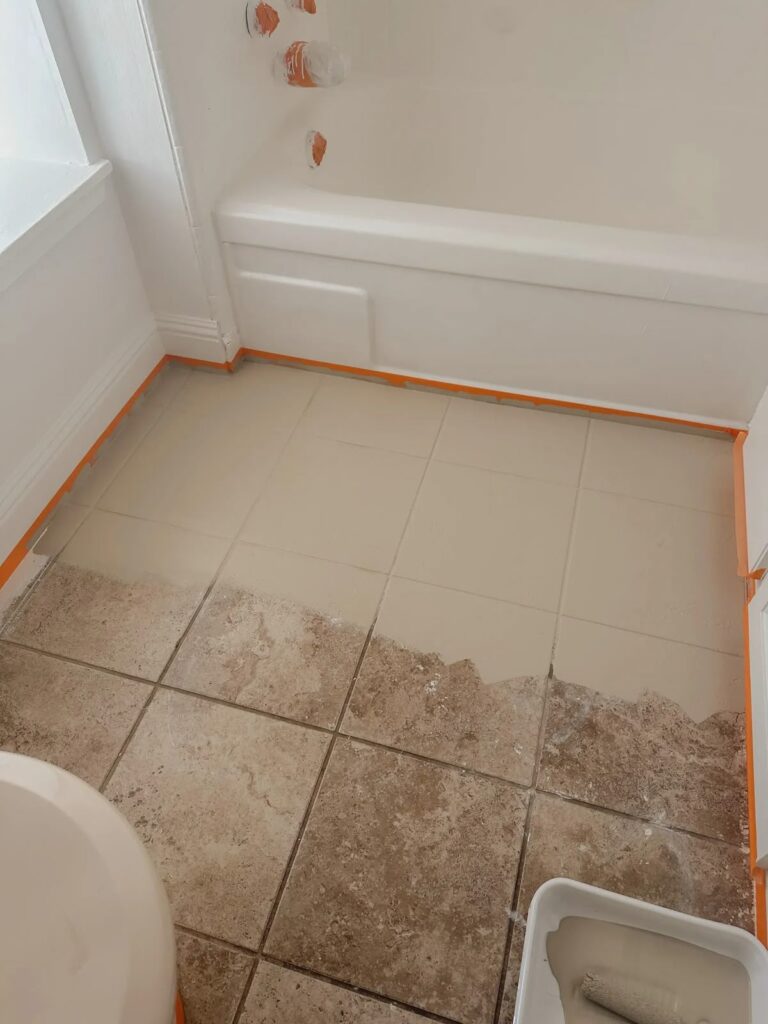
Short answer, yes. But only if you handle prep properly.
Bathrooms deal with moisture, heat, and daily foot traffic. Without proper prep, paint will peel early, especially near the sink or shower.
When done right, the surface holds up for years. When rushed, it starts failing within weeks. Most issues come from skipping sanding or applying paint over residue.
Step 1: Deep Clean Like You Mean It
This step decides everything that comes after.
Start by removing dust, hair, and debris. Then scrub using a degreasing cleaner or TSP, focusing on grout lines and edges. Residue from soap or shampoo is common and easy to miss.
If any film remains, paint will not bond properly and can peel within weeks. Rinse thoroughly and let the surface dry completely. Not slightly damp. Fully dry.
Step 2: Sand It (Don’t Skip This)
Tile is naturally smooth, and paint needs texture to grip.
Use 120 to 220 grit sandpaper to dull the glossy surface. You are not removing the finish, just creating a light abrasion.
In bathrooms with heavy use, this step becomes even more important. Skipping it often leads to chipping in high-traffic areas first.
Wipe all dust away before moving forward. Even a thin layer of sanding dust can affect adhesion.
Step 3: Tape and Protect Everything
Before painting, protect surrounding surfaces.
Tape baseboards, tub edges, vanity sides, and any fixtures nearby. Use drop cloths to cover the floor outside your work area.
Small paint splatters are easy to miss during application, but very noticeable once dry. Taking time here prevents cleanup later.
Step 4: Prime Like a Pro
Primer is what keeps everything in place long-term.
Use a bonding primer designed for tile or glossy surfaces. Apply with a foam roller for even coverage and a brush for grout lines.
In humid bathrooms, primer helps block moisture from reaching the paint layer. Without it, even good paint can fail early.
Let it dry fully before moving on. Rushing this step weakens the entire system.
Step 5: Choosing Your Paint (Epoxy vs. Latex)
The type of paint affects durability and ease of use.
Epoxy paint is more durable and water-resistant. It works well in bathrooms with heavy use, but has a stronger smell and longer curing time.
Latex floor paint is easier to apply and dries faster. It works well with proper primer and sealing, but may wear faster in high-traffic zones.
Avoid wall paint completely. It cannot handle moisture or foot traffic and will peel quickly.
Step 6: Apply the Base Coat
Start from the farthest corner and work toward the exit.
Apply thin, even coats using a roller. Thick layers may look fine at first, but often lead to uneven drying and visible texture.
Allow at least 6 to 8 hours between coats. In humid conditions, drying time may increase, so adjust accordingly.
A smooth finish comes from patience, not extra paint.
Step 7: Want a Pattern? Go For It.
This step is optional, but it can change the look completely.
Use stencils only after the base coat has fully dried. Keep the roller nearly dry to avoid paint bleeding under the stencil.
In smaller bathrooms, subtle patterns work better than bold ones. Large designs can make the space feel tighter.
Even small details like contrasting grout lines can add definition without overwhelming the floor.
Step 8: Seal It
Sealing protects everything you just did.
Use a clear polyurethane sealer made for floors. Apply two to three thin coats, allowing each layer to dry fully.
In wet areas, sealing prevents moisture from breaking down the paint. Skipping this step often leads to early wear, especially near water sources.
A non-slip finish is worth considering for safety.
Drying & Curing Time
This is where patience matters most.
Wait at least 24 to 48 hours before walking on the surface. In humid bathrooms, longer curing times improve durability.
Proper airflow helps. Open windows or use a fan to reduce moisture buildup during this stage.
Stepping on it too early can leave marks that are difficult to fix later.
How to Make It Last
A few habits will extend the life of your painted floor.
Use bath mats near wet areas to reduce direct water exposure. Sweep regularly so dirt does not scratch the surface.
Avoid harsh cleaners like bleach. Stick to gentle solutions to maintain the finish.
High traffic areas may show wear first. This is normal. Keeping extra paint allows for quick touch-ups when needed.
FAQ
What Is The Best Paint For Bathroom Tile Floors
Use epoxy or high-quality latex floor paint designed for moisture and foot traffic. Always pair it with a bonding primer. This combination helps the paint adhere properly and reduces the risk of peeling over time.
How Do You Waterproof Painted Tile
Apply multiple thin coats of a floor sealer after painting. Let each coat dry fully. Proper ventilation and curing time are just as important as the sealer for long-term durability.
Does Painted Tile Last Long
With proper prep and sealing, painted tile can last several years. High traffic areas may wear faster, but touch-ups are simple. It is not permanent, but it is a practical alternative to full replacement.
Final Thoughts
If your bathroom floor is driving you crazy but a full remodel isn’t happening anytime soon, painting the tile is such a solid middle ground.
It’s not instant. It takes a little effort. But the feeling of walking into a space that finally reflects your style? That’s worth a weekend project.
And honestly, if you mess up? You can sand it down and try again. That’s the beauty of DIY.
So if you’ve been staring at that tile thinking “one day,” maybe this is your sign. Grab the primer. Open a window. Put on a playlist. You’ve got this.
Update Your Bathroom on a Budget
• Mauve Bathroom Ideas
• Brown Bathroom Decor Ideas
• Victorian Bathroom Design Ideas
• 1920s Bathroom Ideas