I Finally Cracked Balcony Wall Decor (Yes, It Involves Eye-Level Lighting and Fewer Random Hooks)
Balcony wall decor is a part of outdoor styling that sounds simple until you actually try it. On a small balcony, the wall is your best chance to add privacy, greenery, and atmosphere without sacrificing floor space. But real life gets in the way fast: rental rules, wind, harsh sun, dripping planters, and surfaces that do not play nicely with adhesives.
After too many trial-and-error attempts (and one late-night crash I never want to repeat), I landed on a system that works. It is not about filling the wall. It is about choosing a few vertical elements that earn their spot: planters that improve sightlines, art that can survive outdoors, shelving that holds what you actually use, and lighting placed at eye level so the balcony feels warm instead of glaring.
This guide walks through the exact approach I use, with renter-friendly mounting options and wind-proofing built in.
Supplies Checklist I Actually Use
- Outdoor-rated adhesive hooks or strips (only for very light items)
- Rubbing alcohol and a lint-free cloth (surface prep matters)
- Tape measure
- Zip ties (black and clear)
- Stainless steel S-hooks or small carabiners (rust-resistant)
- Tension rod or tension pole system (great for renters)
- Lightweight planters (resin, plastic, thin powder-coated metal)
- Coco liners or drip trays (drip control is not optional)
- Outdoor-safe twine or coated wire for tie-downs
- Small level or a level app
- Soft rag for pollen and dust (balconies collect both)
Step 0: Read Your Balcony Like a Tiny Weather Station
Before I hang anything, I take two photos from the same spot: one in the morning and one near sunset. It shows me three things I cannot guess correctly in my head: where glare lands, where shadows fall, and what neighbors can see when I sit down.
Then I do three quick checks:
- Wind check: If a dish towel flaps hard on the railing, I treat the balcony as high-wind. That means fewer hanging pieces and more tie-downs.
- Sun check: If the wall gets hours of direct sun, I assume fading will happen and choose UV-stable materials.
- Water check: After a rain, I look for drip paths. If water runs down the wall or drips off the edge, I plan around it with trays and liners.
This is also the moment I confirm what my building allows. It is not fun, but it is cheaper than repairs later.
The Rule That Changed Everything
I stopped treating the wall like a blank canvas and started giving it jobs.
On my balcony, wall decor has to do at least one of these:
- Add privacy at sitting height
- Add greenery without taking floor space
- Create an evening mood with soft light
- Hold useful items (watering can, clippers, small tray)
- Pull attention away from rental eyesores (utility boxes, odd fixtures)
If it does not do a job, it does not go up.
Step 1: Hang Planters for Privacy and Better Sightlines
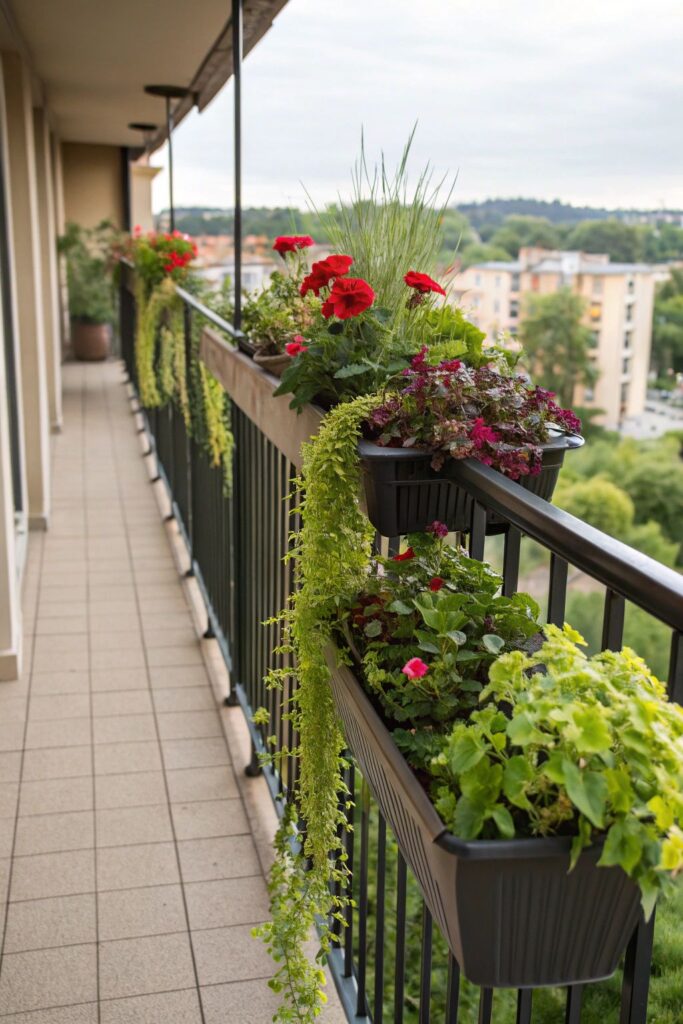
Hanging planters work when they are placed to change what you see while seated. The goal is not to decorate the top of the wall like a gallery. The goal is to soften the view at eye level so the balcony feels sheltered.
Where Hanging Planters Work Best
Hanging planters work best when they add greenery without stealing precious floor space or creating movement problems. On narrow balconies, I like placing them along the railing line, because it keeps the walking area clear and makes the balcony feel wider instead of crowded.
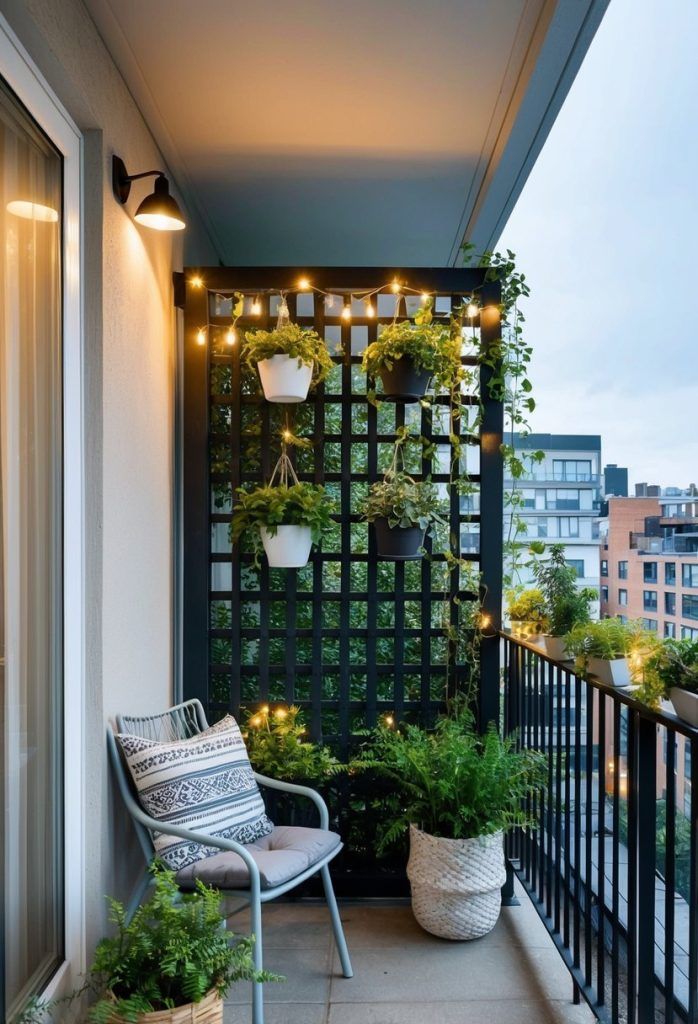
A freestanding grid panel is another great option, especially for renters. It gives you vertical space to work with and lets you hang multiple planters in a controlled way without drilling into walls.
For maximum flexibility, a tension pole system is hard to beat. It is strong, adjustable, and fully removable, which makes it ideal if you want a vertical garden feel without committing to permanent hardware.
What Holds Up Outdoors
Not all hanging planters survive real outdoor conditions, especially sun, rain, and wind.
I stick with resin planters or basic nursery pots slipped inside a nicer outer sleeve. They are lightweight, durable, and easy to replace if needed.
Powder-coated metal pots also work well. They are thin, lightweight, and handle weather better than ceramic without adding too much weight.
For hanging hardware, I use coated chains, stainless steel hooks, or outdoor-rated rope. These materials hold up without rusting or rotting, which matters more than aesthetics once the weather turns.
What I Avoid On Windy Balconies
Wind changes the rules completely, and some items are just not worth the risk.
I avoid heavy ceramic hanging pots because they can chip walls, crack if they hit something, or cause real damage if they fall.
I also skip macrame hangers that stay wet or catch the wind. They look nice at first, but they stretch, mildew, and swing too much outdoors.
Any pot that can swing into the wall or railing is a no for me. It only takes one windy afternoon to damage paint or dent metal.
I also avoid anything that drips freely without a tray. Dripping water stains floors, annoys neighbors below, and creates a constant mess.
Renter-Friendly Hanging Methods That Feel Secure
For renters, security matters just as much as appearance.
Railing planters with zip ties are fast and surprisingly reliable. Even if a planter hooks on securely, I still add zip ties because wind can lift hooks over time.
Railing clamp hooks are a good option if your railing is sturdy and the clamp fits properly. When they fit well, they feel solid and clean.
A freestanding grid panel attached to the railing with zip ties is one of my favorite setups. The panel stays put, and the grid gives you endless flexibility for spacing and rearranging planters.
The tension pole system is my top choice for rentals. It creates a vertical hanging zone without drilling, holds multiple planters securely, and can be removed without leaving any marks.
When hanging planters are placed thoughtfully and secured well, they add greenery and height without turning your balcony into a swinging obstacle course. The key is choosing methods that work with the space, not against it.
Placement Trick That Makes Privacy Feel Natural
I hang greenery where my eyes land when I sit. Not at the top edge. Not near the floor. Mid-height, then layered slightly above and below.
If neighbors overlook from higher windows, I add one trailing plant higher up. If the issue is railing-level visibility, I keep planters fuller and slightly lower.
Step 2: Add Outdoor Wall Art That Will Not Fade or Warp
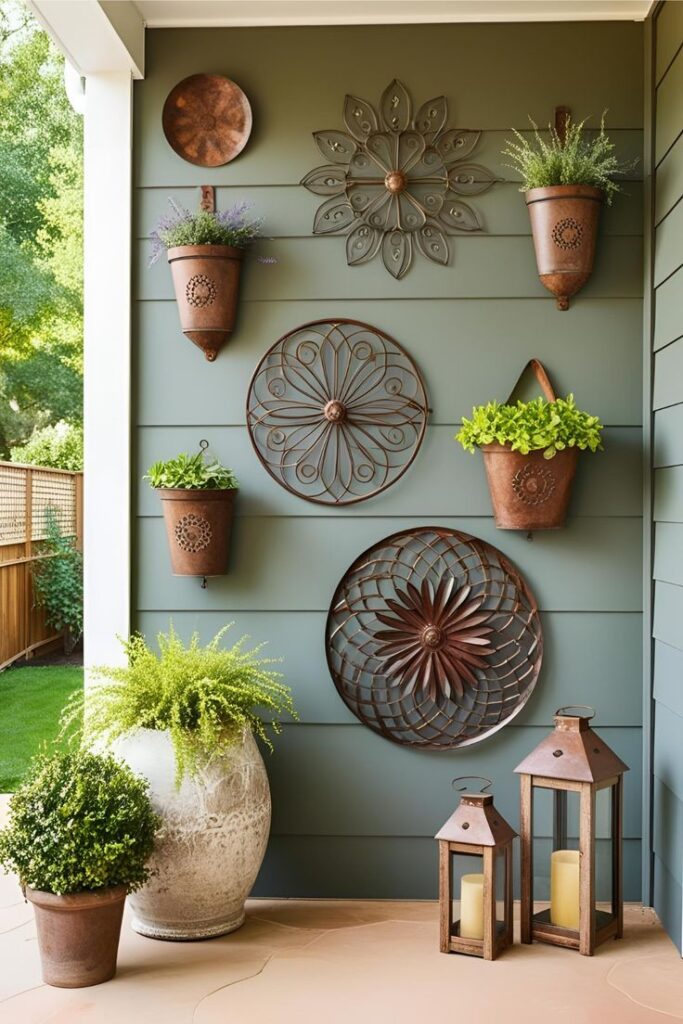
Outdoor art works best when it is simple, lightweight, and mounted like it expects weather. On a small balcony, one piece is often enough to create a focal point and make seating feel intentional.
Materials That Last Outdoors
When adding wall decor or art to a balcony, durability matters more than looks alone. Outdoor conditions are unforgiving, especially sun, rain, and humidity, so I choose materials that can handle exposure without warping or falling apart.
- Powder-coated metal wall art holds up extremely well. It does not absorb moisture, resists rust when properly coated, and stays lightweight enough to hang securely.
- Outdoor-rated resin pieces are another reliable option. They are designed to handle temperature changes and moisture without cracking or fading quickly.
- Aluminum composite prints work surprisingly well outdoors. They are lightweight, stable, and do not warp like wood-backed prints, which makes them safer for balconies and patios.
- UV-rated outdoor fabric panels can work too, but only when they are secured at multiple points. This prevents flapping in the wind and reduces stress on the fabric over time.
What I Skip Outdoors
Some materials simply do not survive outdoor conditions, no matter how nice they look at first.
- Indoor frames, especially those made from MDF or untreated wood, absorb moisture and swell quickly. They are rarely worth the risk.
- Glass-front frames are heavy and fragile. They can break in the wind or temperature changes and create safety issues on balconies.
- Indoor canvas on wooden stretcher bars tends to sag, warp, and mildew when exposed to humidity. Even under cover, it rarely holds up long-term.
Choosing materials made for outdoor use saves money and frustration in the long run. The goal is decor that stays in place and looks good season after season without constant replacement.
Installation Without Drilling Tile
My most reliable renter setup is a railing-mounted grid or freestanding panel. I mount the panel to the railing, then hang art on the panel instead of the building wall. It looks intentional and removes the stress of adhesives failing.
If I use adhesive strips at all, it is only on smooth surfaces and only for light pieces, and I still add a discreet safety tie when wind is a factor.
Step 3: Use Vertical Shelves That Make the Wall Do Real Work
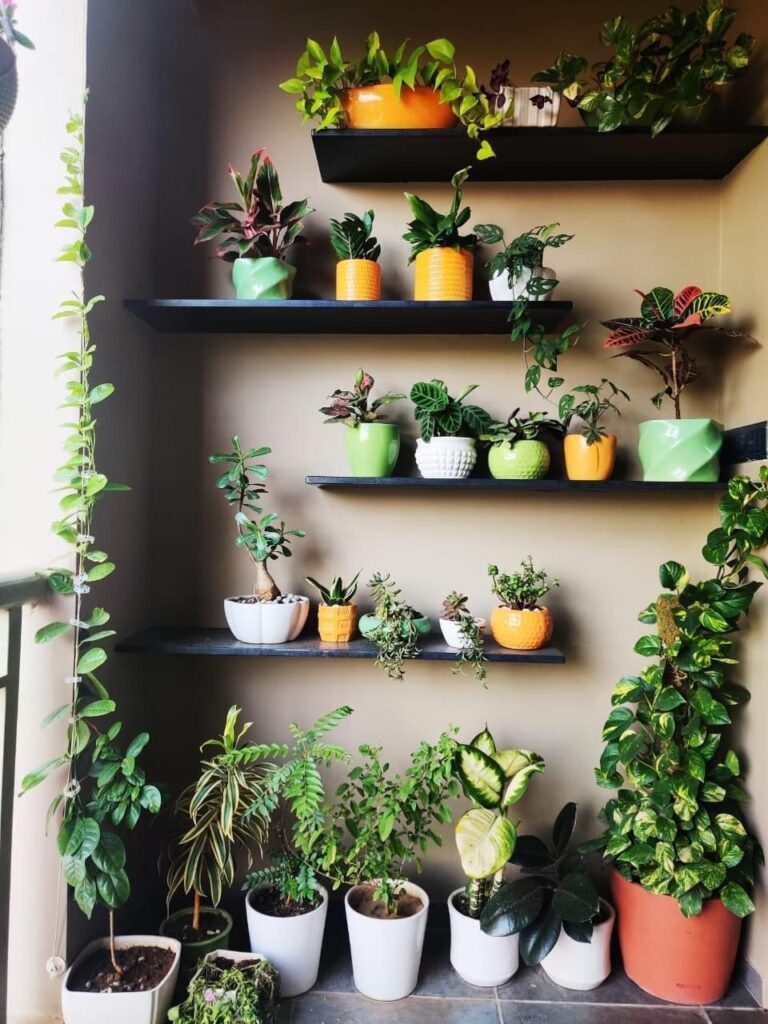
Shelving is the grown-up answer to balcony clutter. Done well, it adds storage and structure without stealing walkway space.
Best Shelf Options For Rentals
When shelving on a balcony, stability matters more than style. I stick to options that do not require drilling and can handle outdoor conditions without wobbling.
- Clamp-on railing shelves are one of the easiest wins. They use the railing for support, keep floor space clear, and feel surprisingly solid when properly tightened.
- Tension pole shelving with adjustable shelves works well when you want vertical storage without committing to one layout. It presses between the floor and the ceiling, which makes it renter-friendly and easy to reposition.
- Narrow freestanding ladder shelves are great for corners or walls, especially when space is tight. If wind is an issue, I discreetly secure them with a tie to the railing or wall so they stay put.
- Metal grid panels used as vertical organizers are incredibly versatile. They can act as shelving, hanging storage, or plant support, and they adapt easily as your setup changes.
Materials That Behave Outdoors
Outdoor shelving only works if the materials can handle exposure.
- Powder-coated steel or aluminum is my first choice. It resists rust, stays lightweight, and holds up well in sun and rain.
- Outdoor-rated resin shelving is another solid option. It does not absorb moisture and usually handles temperature changes without warping.
- Proper outdoor wood can work, but only if it is sealed correctly and maintained over time. It looks great, but it does require more effort.
What Fails Fast Outdoors
Some materials and setups simply do not last.
- Particleboard or MDF swells and crumbles when exposed to moisture, even under partial cover.
- Untreated wood absorbs water quickly and warps, cracks, or grows mildew.
- Heavy pots on upper shelves create balance issues and make shelves feel unstable.
- Top-heavy shelves are risky, especially on windy balconies. If it looks like it could tip, it probably will.
How I Style Balcony Shelves So They Look Calm
Outdoors, less really is more. Too many small items read as clutter very quickly, especially when viewed from inside the apartment.
I keep the setup simple and repeat shapes so the shelf feels intentional instead of busy.
I usually stick to one or two medium-sized plants rather than many small ones. They anchor the shelf visually.
I add one lantern or stable light source for warmth, especially in the evening.
I include one tray or basket to corral small tools or accessories so nothing feels scattered.
Most importantly, I leave breathing room between items. Empty space is part of the design outdoors.
If the shelf starts to feel busy, I always remove the smallest objects first. That one move almost always brings the calm back.
Step 4: Eye-Level Lighting That Feels Warm, Not Harsh
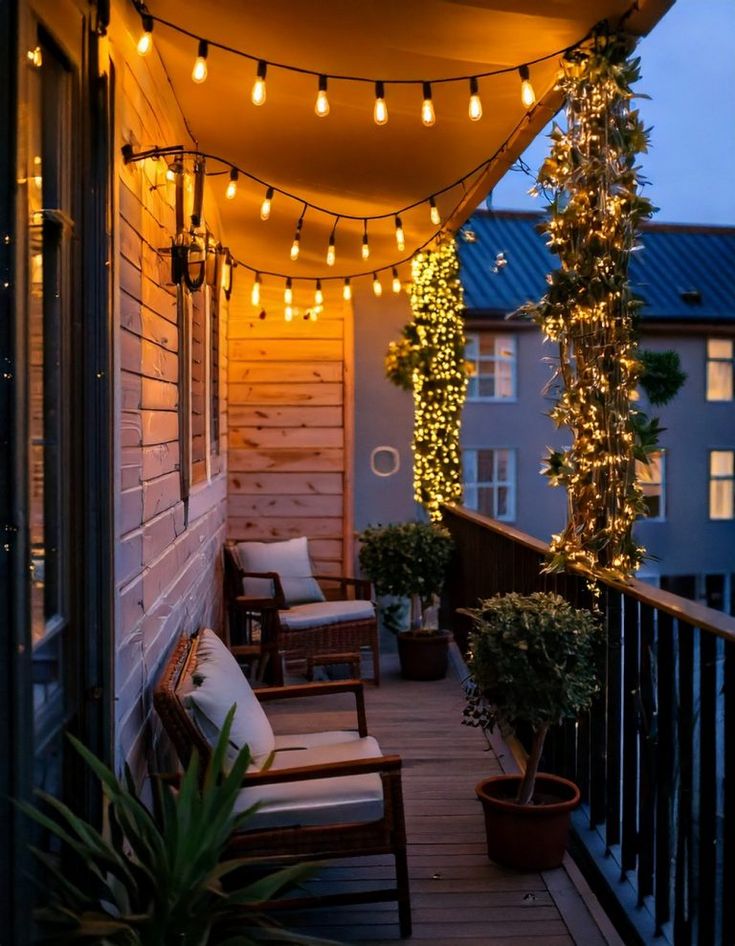
Lighting is the difference between a balcony that looks fine and a balcony you actually use at night. The key is placement.
I aim for eye level or slightly above, with a soft glow directed toward the wall or down toward the seating area. When the lights are too high, the balcony can feel flat. When lights shine straight into your face, the mood disappears.
My Favorite No-Wiring Options
- Solar lanterns on railing hooks at seated height
- Battery lanterns placed on a shelf, aimed toward the wall for reflected glow
- String lights clipped to a grid panel (keeps them controlled and tidy)
- A tension rod with two small lanterns hung at staggered heights
If your neighbor has a bright light that spills into your balcony, placing a lantern at eye level near your seating can help rebalance the space without adding glare.
Step 5: Wind-Proofing and Safety Checks I Do Every Time
Balconies are elevated platforms, so I treat “could this fall” as the main design constraint.
My basic safety routine:
- Tug test every hook and hanger
- Add a backup tie on anything that could swing
- Keep heavy items low and closer to the wall
- Do not block the door swing or walkway
- Use drip trays for every planter
- Avoid glass or breakable decor outdoors
If a piece would make me nervous to hear at midnight, it gets a different mounting method.
Common Balcony Wall Decor Mistakes (and the Fix)
- Too many hooks are scattered everywhere
Fix: Choose one system, like a grid panel or a single shelf zone, and keep everything grouped. - Decor placed too high to matter
Fix: Put greenery and lighting at seated eye level first. - Using indoor items outside
Fix: Stick to outdoor-rated materials or choose pieces that age gracefully. - Planters that drip or swing
Fix: Add trays and stabilizing ties, and avoid top-heavy hanging pots. - Overdecorating a small balcony
Fix: One focal element, one greenery layer, one lighting layer. Stop there.
FAQ
What Is The Best Renter-Friendly Way To Hang Balcony Wall Decor?
The easiest renter-friendly method is using a freestanding grid panel or tension pole system instead of attaching items to the wall. You can secure a grid panel to the railing with zip ties and hang planters, lights, and lightweight art on the grid. It looks intentional, handles wind better than adhesives, and removes cleanly when you move. Adhesive hooks can work for very light items on smooth surfaces, but they are rarely reliable as the main support outdoors.
How Do I Add Privacy With Balcony Wall Decor Without Blocking Airflow?
I aim for layered privacy instead of a solid screen. Hanging planters at seated eye level soften sightlines while still letting air move through. A grid panel with a few planters plus one trailing plant works well because it filters views rather than sealing the balcony off. If you need more coverage, add a second layer with a trellis-style panel or a vertical shelf unit with greenery, keeping gaps so airflow stays comfortable in warm weather.
What Type Of Balcony Wall Art Holds Up In Sun And Rain?
Powder-coated metal art, outdoor-rated resin pieces, and aluminum composite prints tend to hold up best. They resist warping, handle moisture, and are less likely to fade quickly in direct sun. I avoid indoor canvas, wood frames, and anything with glass. If your balcony gets strong sun, choose UV-stable finishes and expect some gradual aging. In windy areas, prioritize lightweight pieces mounted securely with a backup tie so they do not shift or rattle.
Where Should Balcony Lighting Go So It Feels Cozy, Not Harsh?
I place lighting at eye level or slightly above, aimed to create a glow on the wall or downward toward seating. This avoids glare and makes the balcony feel like a small outdoor room. Solar lanterns on railing hooks work well, especially near the chair or reading spot. If you are using string lights, keep them controlled along a grid panel or railing edge rather than overhead in a way that flaps. One warm, stable light source is better than multiple bright ones.
How Do I Keep Balcony Wall Decor From Falling In Strong Wind?
Wind adds tugging and swinging force, not just weight. I choose low-profile pieces, avoid heavy hanging pots, and secure anything that moves with a second attachment point like a discreet tie. Grid panels and tension systems handle wind better than adhesives because they distribute load. I also keep heavier items low on shelves and place tall pieces closer to the wall for shelter. After the first windy day, I recheck everything because that is when weak points show up.
Conclusion
Balcony wall decor gets easier when you stop treating it like a blank wall and start treating it like useful space. One vertical system, a few pieces that add privacy or storage, and lighting placed at eye level can make a small balcony feel finished without clutter.
If someone you know is stuck with a windy rental balcony and keeps giving up on decorating it, share this with friends and family. A simple wall plan can turn a balcony into a space you actually use, not just a place where plants struggle and hooks fail.