17 Backyard Layout Ideas to Transform Your Outdoor Space
Not sure how to make better use of your backyard space? A thoughtful layout can completely change how your outdoor area functions and feels, no matter its size.
Many backyards start as open, undefined spaces that feel disconnected or underused. Without a clear layout, it can be difficult to create areas that feel purposeful or inviting.
A well-planned backyard layout helps organize the space, improve flow, and define zones for relaxing, dining, or entertaining. Even small adjustments in placement and structure can make the entire area feel more cohesive.
From simple arrangements to more detailed designs, there are plenty of ways to shape a backyard around your lifestyle and needs.
Here are 17 backyard layout ideas to transform your outdoor space and help you create a yard that feels balanced, functional, and enjoyable.
How to Choose the Right Layout (Decision Framework)
Before diving into ideas, answer these four questions:
| Question | Your Answer Determines |
|---|---|
| How large is your yard? (sq ft) | Scale and number of zones |
| What’s your budget? | Which features are realistic |
| What climate do you live in? | Material choices, shade needs |
| Who uses the yard most? | Kids, adults, pets — layout priorities |
Quick guide:
- Under 500 sq ft → Focus on 1–2 zones maximum. Ideas #9, #12, #14, #17 work best.
- 500–1,500 sq ft → 2–3 zones possible. Ideas #1, #3, #4, #7, #13 are ideal.
- Over 1,500 sq ft → Full multi-zone layouts. Ideas #5, #8, #10, #11 shine here.
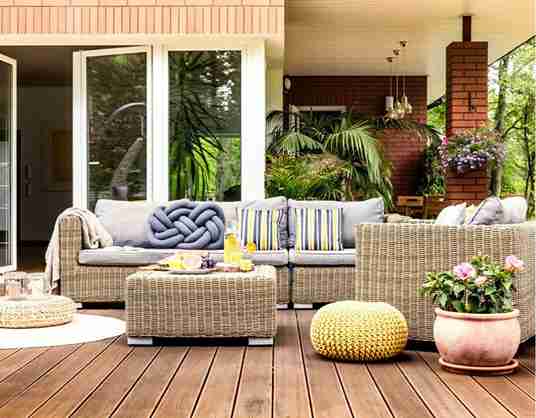
1. Outdoor Living Room
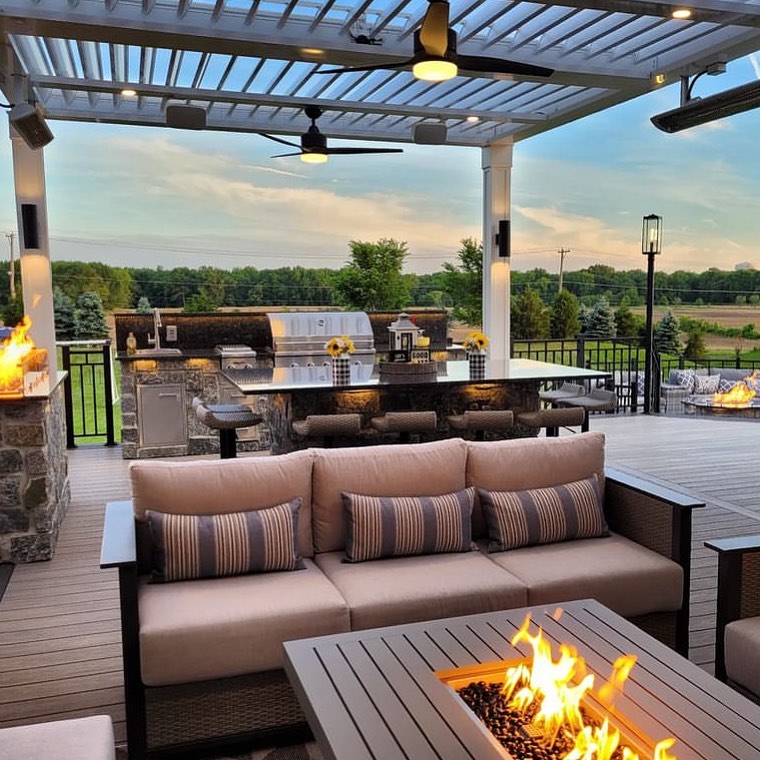
Imagine stepping into your backyard and instantly feeling like you’ve walked into a stylish extension of your home. Create a cozy seating area using weather-resistant sectionals, rattan chairs, and plush outdoor cushions.
Layer the space with outdoor rugs and consider adding a pergola to define the area and provide shade. If you’re looking for modern back porch ideas, integrating wood or composite decking under this layout adds a polished, elevated look.
Recommended Dimensions
Minimum workable size: 12 ft × 14 ft. Ideal: 16 ft × 20 ft. Allow at least 3 ft of clearance between furniture edges and any walls or fencing.
Realistic Cost
- Budget version (basic sectional + pergola kit): $1,500–$3,500
- Mid-range (quality furniture + built pergola + lighting): $5,000–$12,000
- High-end (custom pergola + premium furniture + ceiling fan): $15,000–$30,000
2. Zen-Inspired Garden Retreat
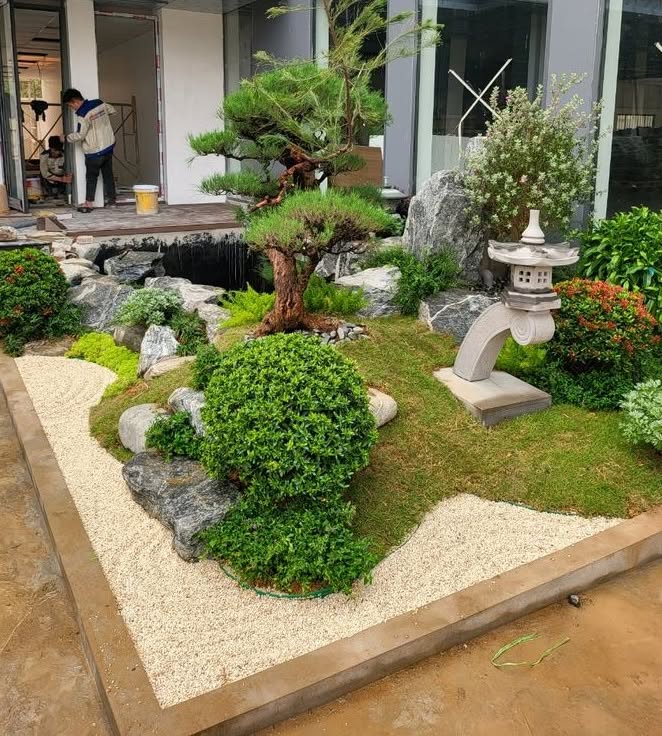
Turn a corner of your backyard into a calming sanctuary. Start by selecting natural elements like gravel, smooth river stones, and bamboo. Add a stone pathway winding through a small water feature—something as simple as a fountain can have a highkey soothing effect.
Surround the space with lush greenery, such as hostas or Japanese maples. This peaceful corner can serve as your go-to spot for meditation, yoga, or just a tranquil cup of tea.
Realistic Cost
- DIY gravel + plants + small fountain: $400–$1,200
- Professional installation with water feature: $3,000–$8,000
Recommended Dimensions
Works well in as little as 8 ft × 8 ft. Ideal: 12 ft × 15 ft.
Plant Picks by Climate
| Climate | Recommended Plants |
|---|---|
| Pacific Northwest | Japanese maple, moss, ferns |
| Southwest / Dry | Ornamental grasses, agave, lavender |
| Southeast / Humid | Camellia, bamboo, river birch |
| Midwest / Northeast | Hostas, astilbe, weeping cherry |
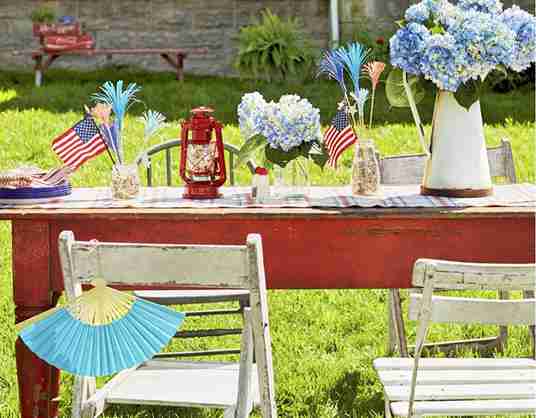
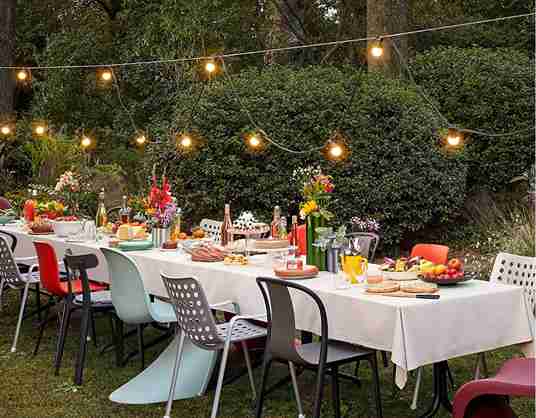
3. Alfresco Dining Area
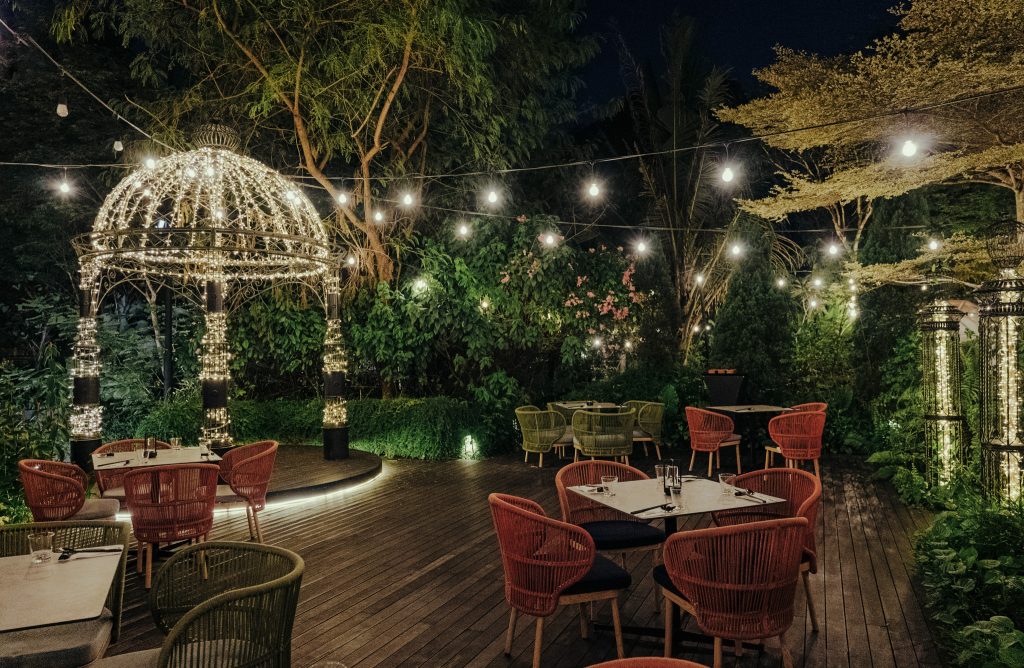
Bring the joy of dining outdoors into your daily life. Start with a weather-resistant dining table in teak or powder-coated metal. Hang string lights overhead or use solar-powered lanterns for a warm, inviting glow. Nearby, a portable bar cart enhances convenience for entertaining guests.
Realistic Cost
- Basic (table + chairs + string lights): $600–$1,800
- Mid-range (+ pergola + heater): $4,000–$9,000
- Full setup (+ outdoor kitchen nearby): $10,000–$25,000+
Recommended Dimensions
Allow 3 ft clearance on all sides of the dining table for comfortable chair pulling. A 6-person table needs roughly 14 ft × 14 ft of dedicated space.
4. Fire Pit Lounge Area
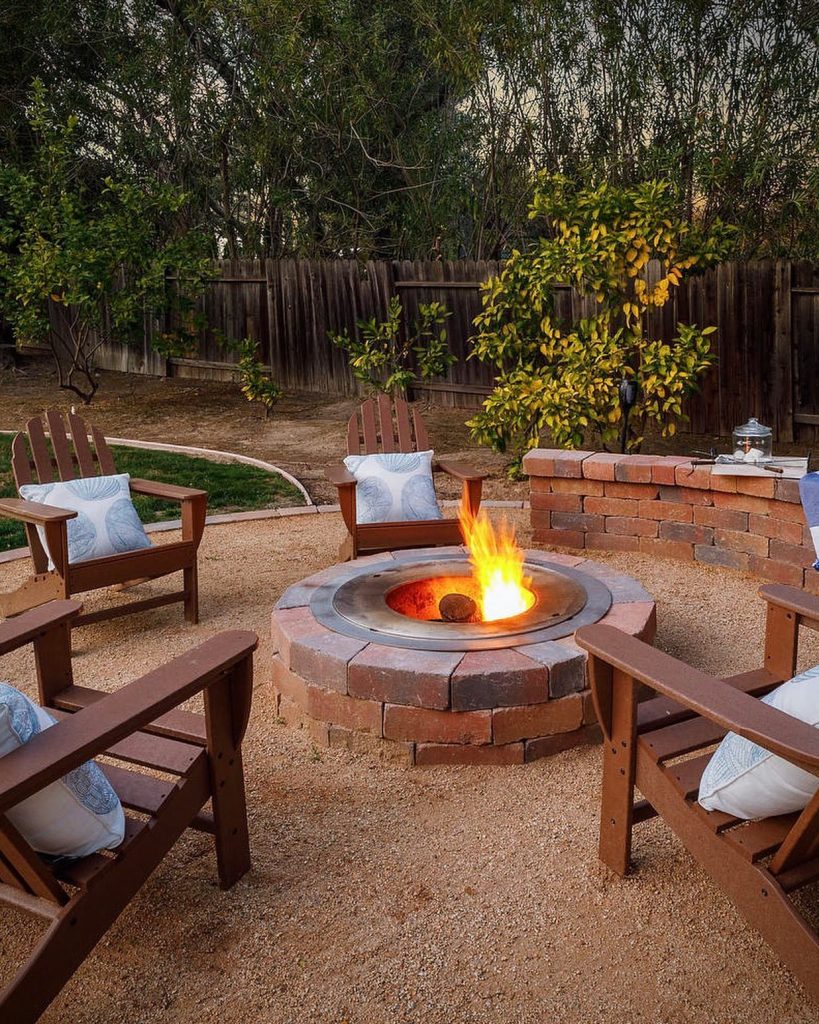
One of the coziest backyard layout ideas is a fire pit lounge. Position a circular or square fire pit in the center, surrounded by Adirondack chairs or tree stumps for a rustic touch. Define the space with stone or gravel flooring to keep it safe and stylish.
Realistic Cost
- Basic portable fire pit + chairs: $300–$900
- Built-in stone/brick fire pit: $1,500–$5,000
- Gas fire pit with seating wall: $4,000–$12,000
Recommended Dimensions
Seating circle: 12–16 ft diameter. Fire pit itself: 36–44 inches is the most comfortable size for groups of 4–8.
Wood-Burning vs. Gas
| Wood | Gas | |
|---|---|---|
| Ambiance | Superior — real flame and crackling | Good but less “authentic” |
| Convenience | Requires wood, ash cleanup | Turn on/off instantly |
| Cost (upfront) | Lower | Higher (gas line or propane tank) |
| Permits | Often required | Almost always required |
5. Multi-Level Decking
If your backyard has a slope, multi-level decking is a practical layout idea. Design separate “zones” for lounging and dining on different tiers. This helps visually organize the space while adding architectural interest. Use composite decking or cedar wood for a stylish foundation.
Realistic Cost
- Pressure-treated wood (DIY-friendly): $15–$25 per sq ft installed
- Composite decking (e.g., Trex, TimberTech): $30–$45 per sq ft installed
- Hardwood (ipe, cedar): $35–$55 per sq ft installed
For a two-level deck totaling 400 sq ft: expect $8,000–$20,000 depending on material and complexity.
6. Backyard Theater
Start with a large, flat wall or an inflatable movie screen. Use a projector paired with Bluetooth speakers. Add soft seating like bean bags or poufs with cozy throws. Place rugs on the ground to define the viewing area, and use string lights to create a cinematic atmosphere.
Realistic Cost
- DIY (inflatable screen + budget projector): $300–$800
- Permanent setup (fixed screen + quality projector + audio): $1,500–$5,000
7. Edible Garden Oasis
Combine beauty with practicality by organizing raised garden beds into a grid. Grow herbs, vegetables, and dwarf fruit trees. Add a small bistro set within the garden area to enjoy the view. It’s a charming, productive way to enjoy outdoor living and reconnect with nature.
Realistic Cost
- 2–4 raised beds (DIY cedar): $200–$600 in materials
- Professional raised bed installation + soil: $800–$2,500
- Add dwarf fruit trees: $50–$150 per tree
Raised Bed Dimensions That Work
- Width: Maximum 4 feet — you should be able to reach the center from either side without stepping in
- Length: 8–12 feet is practical
- Height: 12–18 inches for most vegetables; 24 inches for accessibility or if you want to sit on the edge
Best Starter Crops by Region
| Region | Easiest Vegetables |
|---|---|
| Northeast | Tomatoes, kale, beans, squash |
| Southeast | Peppers, okra, sweet potatoes, collards |
| Midwest | Cucumbers, beets, peas, lettuce |
| Southwest | Herbs, eggplant, peppers, melons |
| Pacific Coast | Year-round lettuce, broccoli, peas, chard |
8. Poolside Paradise
Focus on the lounging area surrounding the water. Position sleek loungers or a cabana set nearby. Add shade with large umbrellas, and use planters with tropical greenery like palms or hibiscus. An outdoor shower adds luxury and convenience for families and guests.
Realistic Cost
- Above-ground pool + basic surround: $4,000–$12,000
- In-ground pool (complete): $40,000–$100,000+
- Poolside landscaping + cabana + outdoor shower (no pool): $5,000–$20,000
Safety Requirements
- Most states require a fence at least 4 feet tall around in-ground pools with self-closing, self-latching gates
- Check local codes — many require the fence to be within 5 feet of the pool edge
- Anti-entrapment drain covers (Virginia Graeme Baker Act compliance) are federally required
9. Boho Lounge Vibes
Mix rattan furniture with colorful floor pillows, patterned rugs, and light tapestries. Hang a macrame swing or hammock for extra character. This layout works beautifully in small urban backyards and embraces a relaxed, free-spirited aesthetic.
Realistic Cost
- Full boho setup (hammock chair + rug + plants + lighting): $500–$2,000
What Actually Holds Up Outdoors
- Rattan/wicker: Only synthetic rattan (resin wicker) survives long-term outdoors. Natural rattan deteriorates rapidly with moisture.
- Textiles: Look for solution-dyed acrylic (Sunbrella) or quick-dry polyester. Avoid cotton and wool outdoors.
- Macramé: Use outdoor-rated polypropylene cord, not jute — jute molds within one season.
10. Playful Family Zone
Include a wooden swing set or sandbox, but make them blend in by using natural materials. Install soft turf or rubber mulch for safety. Divide the area from adult zones using decorative garden beds, allowing kids to play while you supervise from a comfortable distance.
Realistic Cost
- Basic wooden swing set: $800–$2,500
- Premium cedar play structure: $3,000–$8,000
- Ground surfacing (rubber mulch, 200 sq ft): $400–$900
- Artificial turf: $8–$20 per sq ft installed
Safety Surfacing Requirements (CPSC Guidelines)
The Consumer Product Safety Commission recommends a minimum 6-inch depth of protective surfacing (wood chips, rubber mulch, pea gravel) extending 6 feet in all directions from play equipment. For swings, extend twice the height of the swing beam in front and behind.
11. Outdoor Kitchen and Bar
For those who love hosting, layout essentials include a built-in grill, prep sink, and granite countertops. Add bar-style stools and consider a pergola to keep the cooking zone shaded. This setup becomes the ultimate backyard entertaining zone.
Realistic Cost
- Basic (grill island + prep counter): $5,000–$10,000
- Mid-range (+ sink + mini-fridge + bar seating): $12,000–$25,000
- Full luxury kitchen: $30,000–$80,000+
Must-Have Infrastructure
Before building, plan for:
- Gas line extension (if using natural gas): $300–$800 professionally installed
- Electrical outlet(s): GFCI-protected outdoor outlets required by code
- Water line + drain (if adding sink): $500–$2,000
- Permits: Almost always required for built-in outdoor kitchens
Best Counter Materials
| Material | Durability | Maintenance | Cost/sq ft |
|---|---|---|---|
| Granite | Excellent | Seal annually | $60–$100 |
| Concrete | Excellent | Seal twice/year | $70–$120 |
| Porcelain tile | Good | Grout maintenance | $20–$50 |
| Stainless steel | Excellent | Wipe clean | $80–$150 |
12. Hammock Hideaway
Pick a secluded corner under a shade tree or use a freestanding hammock stand. Surround the area with potted plants or climbing vines for privacy. A small side table for your drinks and books turns this corner into a serene escape.
Realistic Cost
- Freestanding hammock stand + hammock: $150–$500
- Between-tree setup + hardware: $30–$100
- Full corner setup (hammock + plants + small table + lighting): $300–$1,000
Tree Hanging Requirements
- Trees must be at least 12 inches in diameter
- Use tree straps (1–2 inches wide) rather than rope or chain — thin lines damage bark
- Ideal distance between trees: 13–15 feet for a standard hammock
- Height: Hang attachment points 4.5–5 feet high for a comfortable hang angle
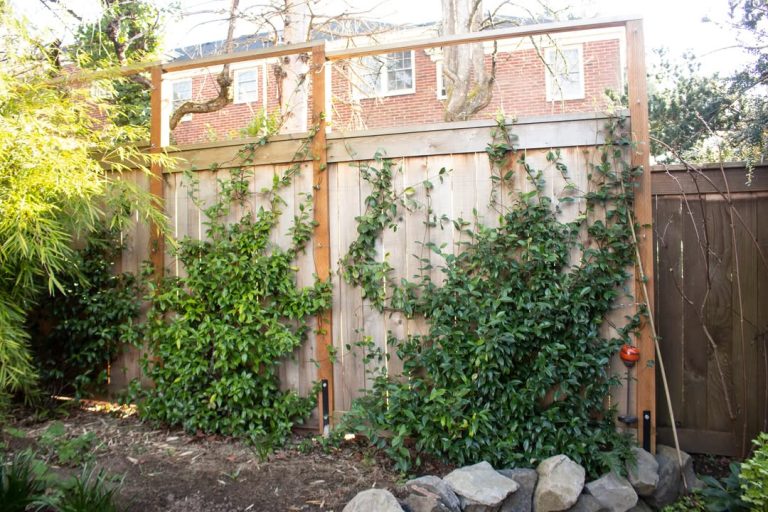
13. Garden Nook With Pergola
Create a romantic, European-inspired escape. Erect a wooden pergola and train vines like wisteria to climb the structure. Add a cozy bench underneath for a picturesque seating area perfect for journaling or sipping tea.
Realistic Cost
- DIY pergola kit (cedar, 10×12 ft): $800–$2,500 in materials + your time
- Professionally installed pergola: $3,000–$8,000
- With climbing plants + bench + lighting: Add $300–$1,000
Best Climbing Plants by Pergola Coverage Speed
| Plant | Coverage Speed | Sun | Notes |
|---|---|---|---|
| Wisteria | Fast (2–3 years) | Full sun | Heavy; needs strong structure |
| Clematis | Medium (2–4 years) | Roots in shade, top in sun | Many varieties, colorful |
| Climbing hydrangea | Slow (3–5 years) | Part shade | Beautiful, fragrant |
| Honeysuckle | Fast (1–2 years) | Full to part sun | Can be invasive in some regions |
| Climbing roses | Medium | Full sun | Thorny but stunning |
14. Modern Minimalist Patio
Center on simplicity with a neutral color palette of grays and blacks. Use furniture with sleek lines and limit decor to a few statement pieces, like a geometric fire bowl. Opt for concrete or stone pavers to keep the look clean and low-maintenance.
Realistic Cost
- Concrete pavers (200 sq ft, DIY): $600–$1,500 in materials
- Professionally installed paver patio: $15–$30 per sq ft
- Full minimalist setup (pavers + furniture + fire bowl): $3,000–$12,000
Paver Options Compared
| Paver Type | Look | Durability | Cost/sq ft installed |
|---|---|---|---|
| Concrete pavers | Modern, customizable | Very good | $10–$20 |
| Porcelain tile | Sleek, premium | Excellent (frost-rated needed in cold climates) | $15–$30 |
| Limestone | Natural, soft | Good | $12–$25 |
| Bluestone | Classic minimalist | Excellent | $20–$40 |
15. Spa-Inspired Corner Retreat
Install a hot tub surrounded by natural wood decking. Use tall plants or privacy screens to enclose the area. Water features like trickling fountains enhance the soothing ambiance. Stick with a serene palette of soft blues and creams for that spa-like feel.
Realistic Cost
- Hot tub (entry-level, 4-person): $3,000–$6,000
- Mid-range hot tub: $6,000–$10,000
- Premium/luxury hot tub: $10,000–$20,000+
- Deck surround + privacy screening + lighting: Add $2,000–$8,000
Electrical Requirements
Most hot tubs require a dedicated 240V, 50-amp GFCI circuit installed by a licensed electrician ($500–$1,500). This is non-negotiable — improper wiring is a serious electrocution hazard near water.
Privacy Screening Options
| Option | Cost | Permanence | Speed |
|---|---|---|---|
| Bamboo screen panels | $$ | 5–10 years | Immediate |
| Arborvitae hedge | $ | Permanent | 3–5 years to fill in |
| Lattice + vines | $ | Variable | 2–3 years with vines |
| Wooden privacy fence | $$$ | Permanent | Immediate |
16. Covered Porch Extension
Turn your back porch into a stylish, extended living area. Add a ceiling fan, outdoor curtains, and cozy rugs. You can divide the space into lounging and dining zones, making it an all-season destination for your family.
Realistic Cost
- Furniture + ceiling fan + curtains + rug: $1,000–$4,000
- Adding a roof/cover to an open porch: $4,000–$15,000
- Full enclosed screened porch conversion: $8,000–$25,000
Ceiling Fan Selection
For outdoor use, you need a UL-listed “wet-rated” or, at a minimum, “damp-rated“ ceiling fan. Dry-rated indoor fans will corrode and fail quickly outdoors. Recommended blade span: 44 inches for porches up to 144 sq ft; 52 inches for larger spaces.
All-Season Comfort Add-Ons
| Addition | Cost | Impact |
|---|---|---|
| Ceiling fan | $150–$500 | Essential for summer use |
| Outdoor heater (wall/ceiling) | $200–$800 | Extends use into fall/winter |
| Outdoor curtains | $100–$400 | Privacy + wind + aesthetic |
| Outdoor rug | $80–$400 | Defines space, adds warmth |
| Mosquito screen panels | $200–$800 | Game-changer in humid climates |
17. Artistic Gravel Garden
A gravel garden blends artistry with ease of maintenance. Use pea gravel as a base and arrange succulents or agaves in asymmetrical groupings. Use large stepping stones to create paths. This layout is pet-friendly and excellent for low-water gardening.
Realistic Cost
- DIY gravel garden (200 sq ft): $300–$900
- Professional xeriscape design + installation: $3,000–$10,000
- Water savings: Up to 50–70% reduction in outdoor water use vs. traditional lawn
Gravel Types and Uses
| Gravel Type | Size | Best Use | Cost/ton |
|---|---|---|---|
| Pea gravel | 3/8 inch | Walking paths, seating areas | $25–$55 |
| Decomposed granite | Fines | Base layer, compacts well | $20–$45 |
| River rock | 1–3 inch | Decorative beds, drainage | $30–$65 |
| Crushed granite | 3/4 inch | Driveways, high-traffic areas | $25–$50 |
Best Plants for Gravel Gardens
- Part shade/moderate water: Catmint, salvia, echinacea, yarrow
- Full sun/dry: Lavender, Russian sage, sedum, agave, ornamental grasses
Frequently Asked Questions
How far should a fire pit be from the house?
The International Fire Code recommends a minimum of 10 feet from any structure. Many local codes require more checks with your municipality. Gas fire pits may have different requirements than wood-burning.
Do I need a permit for a pergola or deck?
In most U.S. jurisdictions, yes. Any attached structure or freestanding structure over a certain size (commonly 120–200 sq ft) requires a building permit. Decks over 30 inches above grade almost always need permits. Check with your local building department, as unpermitted structures can create serious problems during home sales.
How much does a complete backyard makeover cost?
It ranges dramatically:
- Starter transformation (furniture + lighting + plants): $1,000–$5,000
- Mid-range (patio + pergola + outdoor kitchen basics): $10,000–$30,000
- Full luxury (pool + outdoor kitchen + full landscaping): $80,000–$200,000+
Most homeowners spend $5,000–$15,000 for a meaningful backyard upgrade.
What’s the best low-maintenance ground cover?
Decomposed granite and artificial turf require the least maintenance. Composite decking (Trex, TimberTech) is the lowest-maintenance option if you want a deck surface with no staining, no sealing, just annual washing.
How can I make my backyard more private without a tall fence?
Effective options that avoid fence permit issues:
- Arborvitae planted 3 feet apart creates a dense living wall in 3–5 years
- Lattice panels with fast-growing clematis or jasmine
- Outdoor curtains on a pergola are dramatic and elegant
- Tall ornamental grasses (Miscanthus, pampas) for soft, natural screening
What backyard improvement adds the most home value?
According to the 2026 Cost vs. Value Report from Remodeling Magazine:
- Wood deck addition: ~65% ROI
- Patio addition: ~55% ROI
- Composite deck addition: ~60% ROI
Fire pits and outdoor kitchens add appeal but are harder to assign direct dollar values to — they differentiate your home at showing time.
Final Thoughts
The best backyard layout isn’t the most expensive one — it’s the one designed around how you actually live. A $500 hammock hideaway that you use three times a week beats a $50,000 outdoor kitchen that sits untouched.
Start by picking one zone, doing it properly, and expanding from there. Get the infrastructure right (electrical, drainage, structure), choose materials rated for your climate, and don’t skip permits on work that requires them.
Your backyard can genuinely be one of the best rooms in your home. It just needs a plan.