21 Tool Storage Ideas That Finally Fix Workshop Clutter
Have you ever spent more time looking for a tool than actually using it?
Tool storage tends to become chaotic over time. Screwdrivers mix with drill bits, measuring tapes disappear, and small hardware ends up scattered across drawers or shelves. The problem is rarely the number of tools, it is the lack of a system designed around how you work.
DIY storage solutions can completely transform a workspace. Wall-mounted pegboards, custom shelving, labeled bins, magnetic strips, and modular cabinets allow you to use vertical space efficiently while keeping frequently used tools within reach. When everything has a designated place, projects move faster and cleanup becomes easier.
Durability also matters. Sturdy materials, secure mounting, and thoughtful spacing ensure your setup holds up over time. Even simple upgrades, like shadow boards or repurposed containers, can add both function and visual order to your workshop or garage.
Here are 21 Tool Storage DIY Ideas to help you build a practical, organized system that keeps your tools accessible and your workspace running smoothly.
1. Repurposed Wooden Pallet Tool Rack
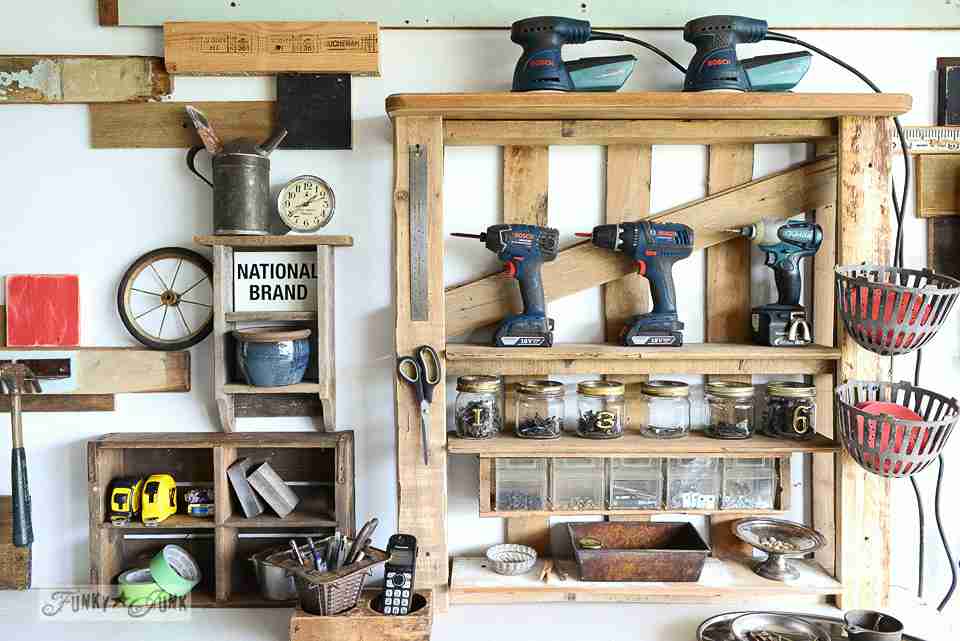
One of the most budget-friendly and eco-friendly options is using a repurposed wooden pallet. Pallets are versatile and can be found almost anywhere, making them a great choice for DIY projects. This tool rack is a simple, yet effective solution for hanging and organizing your tools.
How to Make It:
Start by securing the pallet to the wall using strong screws or wall anchors. Once mounted, you can attach hooks to the slats to hold your tools. The beauty of this project lies in its simplicity – you can customize the pallet by sanding it down for a rustic look, painting it to match your décor, or even adding a coat of wood stain for a more polished finish.
For added functionality, consider installing a small shelf at the bottom of the pallet for storing smaller items like screws, nails, or tape measures. With minimal effort, you’ll have a sturdy, organized, and stylish tool storage solution that’s easy to access and keeps your workspace free from clutter.
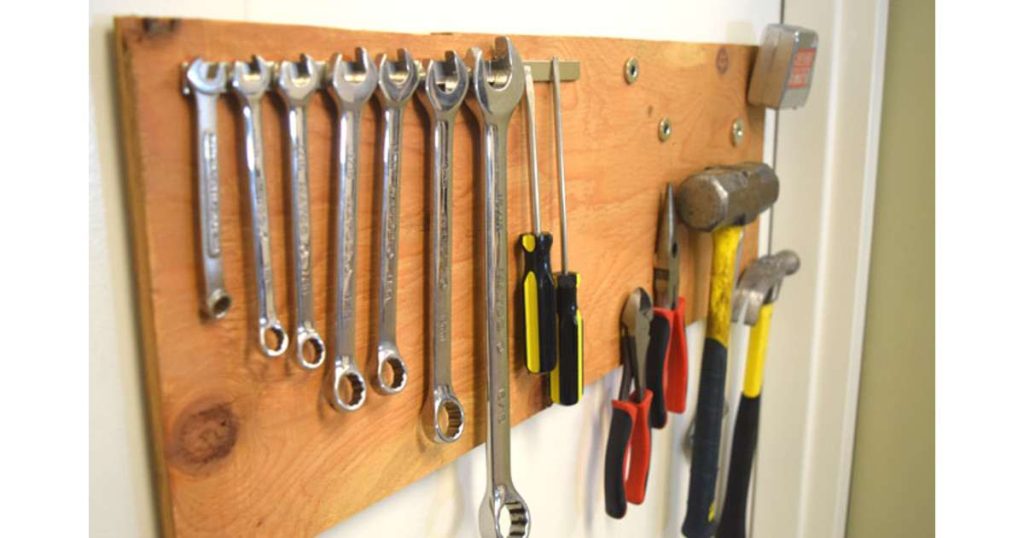
2. Magnetic Tool Strip

If you’re looking for a sleek, efficient way to store metal tools, a magnetic tool strip is an excellent solution. Magnetic strips are incredibly strong and allow you to store tools in a way that’s both practical and aesthetically pleasing.
How to Make It:
To create your own magnetic tool strip, start by selecting a high-quality magnetic strip. Measure the length of the area where you plan to install it – a typical length for a magnetic strip is between 12 to 24 inches. Mount the strip to the wall using screws or adhesive, depending on the surface you’re working with.
This setup works wonders for tools like screwdrivers, pliers, or even smaller power tools. The magnetic force keeps them securely in place while also making it easy to grab what you need quickly. Bonus: The sleek design keeps your tools visible, so you’ll always know where they are!
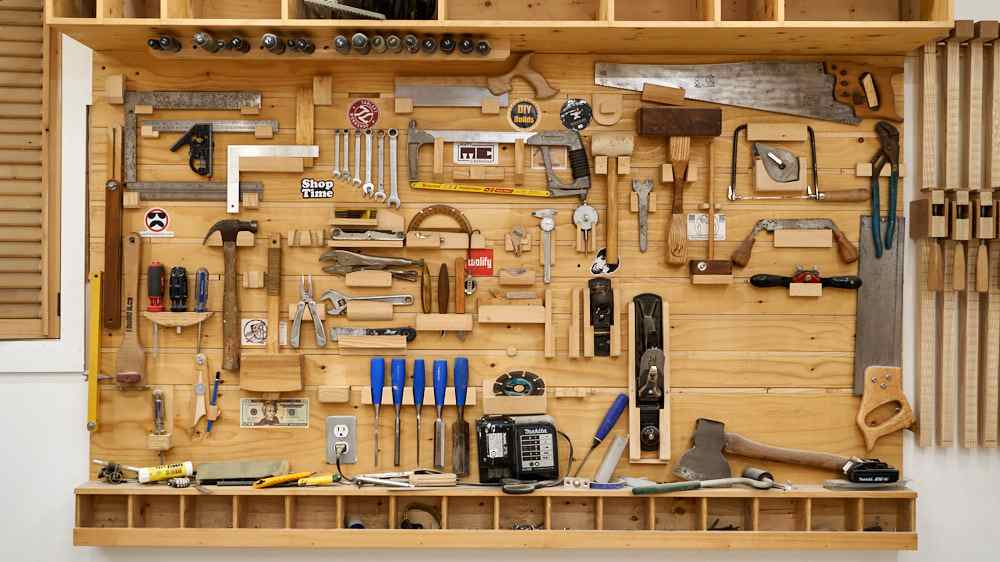
3. Hanging Tool Organizer with Pegboard
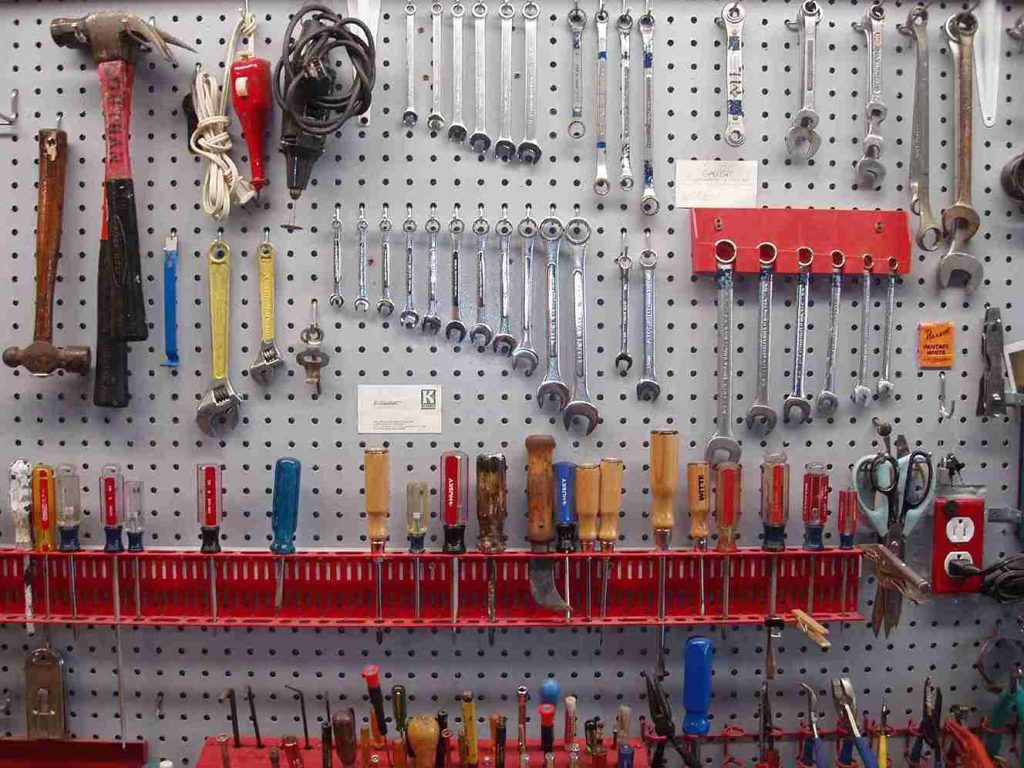
Pegboards are a classic and incredibly versatile option for tool storage. They allow you to hang up a wide variety of tools, from hammers and screwdrivers to more specialized items. A pegboard is an easy DIY project that can transform any blank wall into a functional and organized tool station.
How to Make It:
Start by measuring your wall space and cutting your pegboard to fit. Once you have the pegboard, mount it securely to the wall using screws or heavy-duty adhesive strips. The real magic happens when you start adding hooks, baskets, and shelves to the board. Organize your tools by type – place pliers and wrenches on one section, screwdrivers on another, and smaller items in the baskets below.
Pegboards can also be customized by adding extra features, such as labels or additional shelves for even more storage space. This setup ensures that your tools are neatly stored and always within arm’s reach.
4. DIY Toolbox with Compartments

A toolbox is essential for keeping smaller tools organized and easily portable. But instead of buying one, why not make your own? A DIY toolbox with compartments is a customizable solution that you can create to suit your exact needs.
How to Make It:
Begin by selecting the materials for your toolbox. Plywood is a sturdy and affordable option for the box itself, and you can use thin wooden dividers to create compartments inside. You’ll need a saw, hammer, and nails to assemble the box. Start by cutting the plywood to create the sides, bottom, and top of your toolbox. Once the frame is assembled, add dividers inside to separate tools by size or function.
For a personal touch, add a coat of paint or stain to the exterior. Not only will this toolbox keep your tools organized, but it will also look great on your workbench!
5. Repurposed Jar Wall Storage
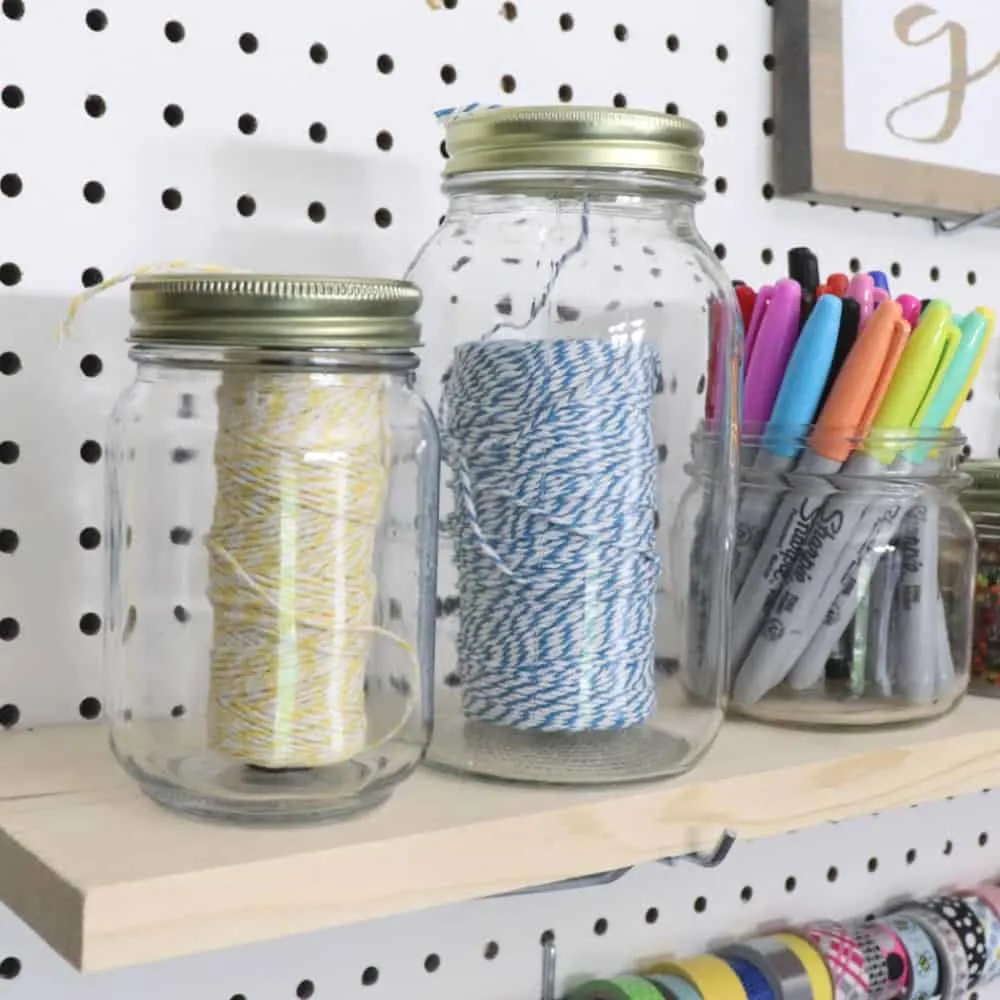
Have an old collection of glass jars sitting around? Repurposing them for tool storage is an easy and functional DIY project. Jars are perfect for holding small items like nails, screws, washers, and even tiny hand tools.
How to Make It:
Start by attaching the lids of the jars to a wooden board or directly to a wall. You can use screws, adhesive, or heavy-duty double-sided tape to secure the lids. Once the lids are in place, simply screw the jars onto the lids, and voilà – you’ve got a quirky, organized storage solution for all those small items that tend to get lost in the clutter.
This project is not only practical but also a great way to repurpose items you already have at home. You can even label each jar to make it easier to find exactly what you need.
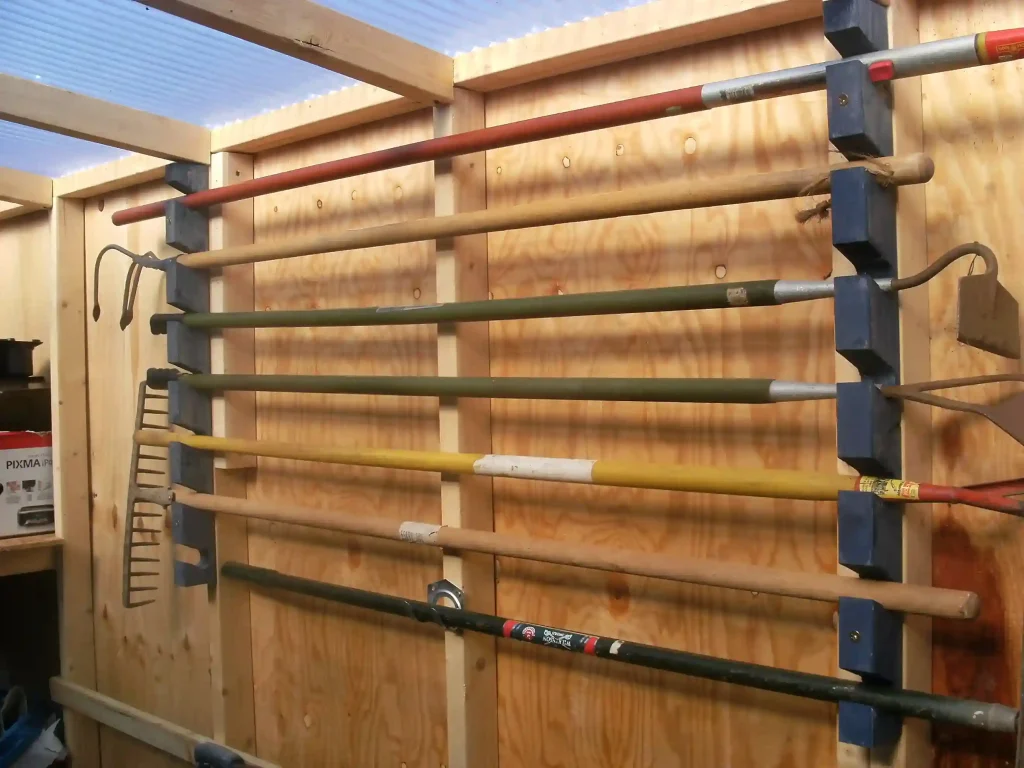
6. Overhead Storage Rack for Larger Tools
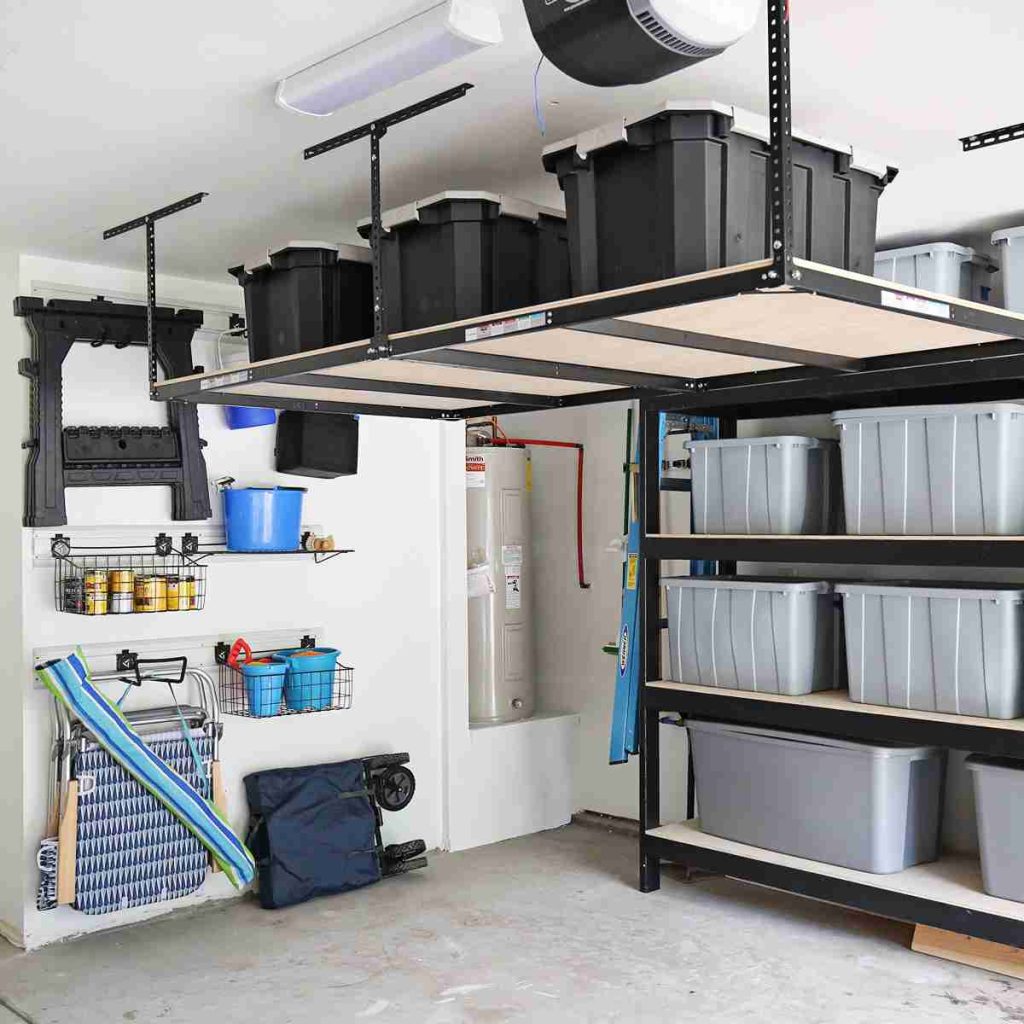
If you’ve got bulky tools like ladders, shovels, or power tools, an overhead storage rack is a great way to free up valuable floor space. This DIY project makes use of the vertical space in your garage or shed, keeping larger items out of the way but still easily accessible.
How to Make It:
To build an overhead storage rack, start by measuring the ceiling height in your space. You’ll need sturdy brackets and shelving to support the weight of the tools. Install the brackets in the ceiling, making sure they are secured to the studs for maximum stability. Add a shelf or platform to the brackets where you can stack or hang your larger tools.
This is a fantastic way to utilize unused ceiling space and keep your garage or shed organized. For added convenience, you can add hooks or a pulley system to make it even easier to retrieve your larger tools when needed.
7. Rolling Tool Cart
For those who need a portable tool storage solution, a rolling tool cart is perfect. Whether you’re working in the garage, on a job site, or simply need to move your tools from one room to another, a rolling cart makes it easy to take everything with you.
How to Make It:
Start by selecting a sturdy cart or repurposing an old one. You can use a wooden crate, a repurposed kitchen cart, or even build your own from scratch using plywood and wheels. Ensure that the cart has multiple levels or compartments to separate your tools. Add hooks or baskets to hold tools like screwdrivers, drills, or tape measures.
For added functionality, consider incorporating a locking system or adding a handle to make the cart easier to move. You can also customize the cart with paint to match your style and space.
8. Vertical Tool Storage Stand

When you’re dealing with limited floor space, vertical storage is a great solution. A vertical tool storage stand allows you to store your tools in an upright position, saving valuable room and making everything easy to find.
How to Make It:
Start by building a tall, narrow stand with shelves or slots designed to hold different tools. Use materials like plywood or MDF for the structure, and ensure that each section is wide enough to accommodate your tools. You can create adjustable shelves to hold items like hammers, drills, and other hand tools.
This stand is perfect for smaller garages or work areas where horizontal space is limited. The vertical design keeps your tools organized, visible, and easy to access.
9. Customized Wooden Tool Chest
A tool chest can be both functional and aesthetically pleasing. With a little DIY know-how, you can build your own tool chest that fits perfectly into your space while giving your tools a safe and stylish home.
How to Make It:
To start, gather your materials, including wood, screws, and hinges. Cut the wood into panels to create a rectangular chest with a lid. You can add compartments inside to separate different tools and make sure each item has its own space. For added style, consider adding a handle to the lid or painting the chest with a bright color.
This is a larger project but one that can provide long-term storage and organization for all your tools. You’ll have a dedicated space for everything, keeping your garage or shed clutter-free.
10. Hanging Shoe Organizer for Smaller Tools
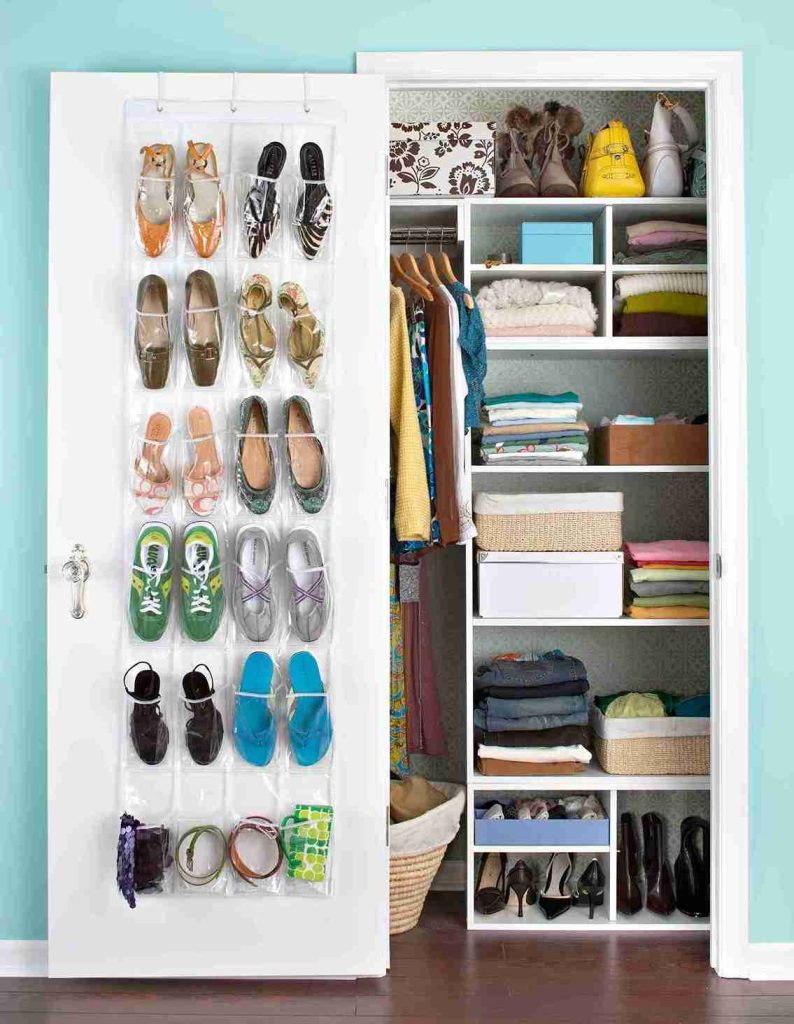
Sometimes, all you need to store is a few smaller items, like screwdrivers, tape measures, and pliers. A hanging shoe organizer can be a surprisingly effective way to store your tools while keeping them organized and easy to access.
How to Make It:
To create your own hanging tool organizer, start by repurposing a fabric shoe organizer with pockets. Hang it over a door or on a wall, and use each pocket to store a different tool. You can also add labels to each pocket for easier identification. This solution is particularly great for small tools that tend to get lost in larger containers.
With this simple and affordable DIY project, you’ll free up drawer space and keep your tools neatly stored, ready for use.
11. Tool Drawer Inserts

If you prefer to store your tools in a drawer, tool drawer inserts are a great way to keep everything organized and easy to find. This DIY solution is perfect for smaller tools that you don’t need to hang or display.
How to Make It:
To create your own inserts, measure the inside of your drawer and cut pieces of wood or foam to create compartments. You can design the compartments to fit your tools precisely, ensuring that each item stays in place. For extra organization, consider adding foam padding to prevent your tools from moving around or getting damaged.
Tool drawer inserts keep your workspace tidy and help prevent you from wasting time searching for the right tool.
12. Corkboard Tool Organizer

If you love a creative, customizable solution, then a corkboard tool organizer is an excellent choice. It’s simple, effective, and lets you create a tool display that is both functional and aesthetically pleasing. Corkboards add a rustic touch to your space while keeping your tools organized and within reach.
How to Make It:
Start by selecting a corkboard that fits the wall space you have available. You can buy a pre-made corkboard or even create your own by using cork tiles. Mount the corkboard securely to the wall, and then use pushpins or small hooks to hang your tools. A good tip is to group similar tools together and add labels next to each section for easy identification.
The flexibility of this project means you can customize it to suit your needs. Whether you want to hang just a few items or need a larger display, this DIY organizer will ensure that your tools stay visible, easily accessible, and tidy.
13. Tool Shelf with Labeling System

Tool shelves are an efficient way to store larger items, while a labeling system ensures that each tool has its designated space. This DIY solution helps prevent tools from piling up in one disorganized heap and allows you to store everything neatly while still keeping it easily accessible.
How to Make It:
To start, you’ll need sturdy shelving – whether it’s floating shelves, wooden planks, or an old bookshelf. Install the shelves on a wall or in a garage corner, depending on your available space. Once your shelves are up, organize your tools by category and add small baskets or bins for even smaller items like screws, bolts, and adhesives.
The key to making this system work for you is labels. Use label tags or even chalkboard stickers to mark each shelf or bin with its contents. This way, you’ll know exactly where each tool belongs, and your workspace will always stay clutter-free.
14. Recycled PVC Pipe Tool Holder

If you have leftover PVC pipes lying around, you can repurpose them into a functional tool holder. This simple project is not only environmentally friendly but also a great way to store long-handled tools like brooms, shovels, and rakes.
How to Make It:
Start by cutting the PVC pipes into sections of varying sizes, depending on the tools you need to store. Next, arrange the pieces in a row or a square pattern, ensuring they’re stable. Mount the PVC pipe holder to the wall or secure it with a wooden frame to keep everything in place.
You can even personalize this by painting the pipes or labeling each one with the tool it holds. This project is quick, easy, and an excellent way to repurpose materials you already have at home!
15. Wooden Crate Tool Storage
Wooden crates offer a charming, rustic way to organize your tools while adding a touch of farmhouse style to your space. Whether you’re using crates for storage on the ground or stacking them to create a larger storage unit, this DIY solution is both versatile and stylish.
How to Make It:
Start with a few wooden crates, which can be found at many home improvement stores or repurposed from other furniture. Arrange the crates in a stack or side-by-side, securing them to the wall if needed for extra stability. Add labels to each crate, and designate different crates for different types of tools.
You can also paint or stain the crates to match your existing décor. Wooden crates provide ample space for larger tools, and their open design makes it easy to see what you have at a glance.
16. Clothesline Tool Holder
This is a quirky and budget-friendly idea that works well for smaller hand tools. A clothesline tool holder allows you to hang tools like pliers, screwdrivers, and hammers from a simple line, similar to how you’d hang clothes to dry.
How to Make It:
Install a clothesline at a height that suits your space. You can use strong twine or a wire rope, and secure it tightly to both sides of the wall or frame. Attach your tools using clothespins or hooks, grouping them by type or frequency of use.
This project works well in small sheds or garages and adds a creative, unexpected touch to your tool storage setup. Plus, it’s inexpensive and can be installed quickly, giving your tools a unique place to call home.
17. Magnetic Tool Holders for Drill Bits
Drill bits are small and easy to misplace, but with a magnetic holder, you can ensure they stay in place. This simple solution keeps your drill bits organized and accessible, allowing you to grab them in seconds when needed.
How to Make It:
To create your own magnetic tool holder, use a magnetic strip or board that’s strong enough to hold the weight of your drill bits. Mount the magnetic strip onto a wall or a tool cabinet near your drill. Then, simply attach your drill bits to the magnet, keeping them neatly stored and easily accessible.
This is a great way to avoid digging through drawers for that one elusive drill bit and to keep your drill bits in top condition for your next project.
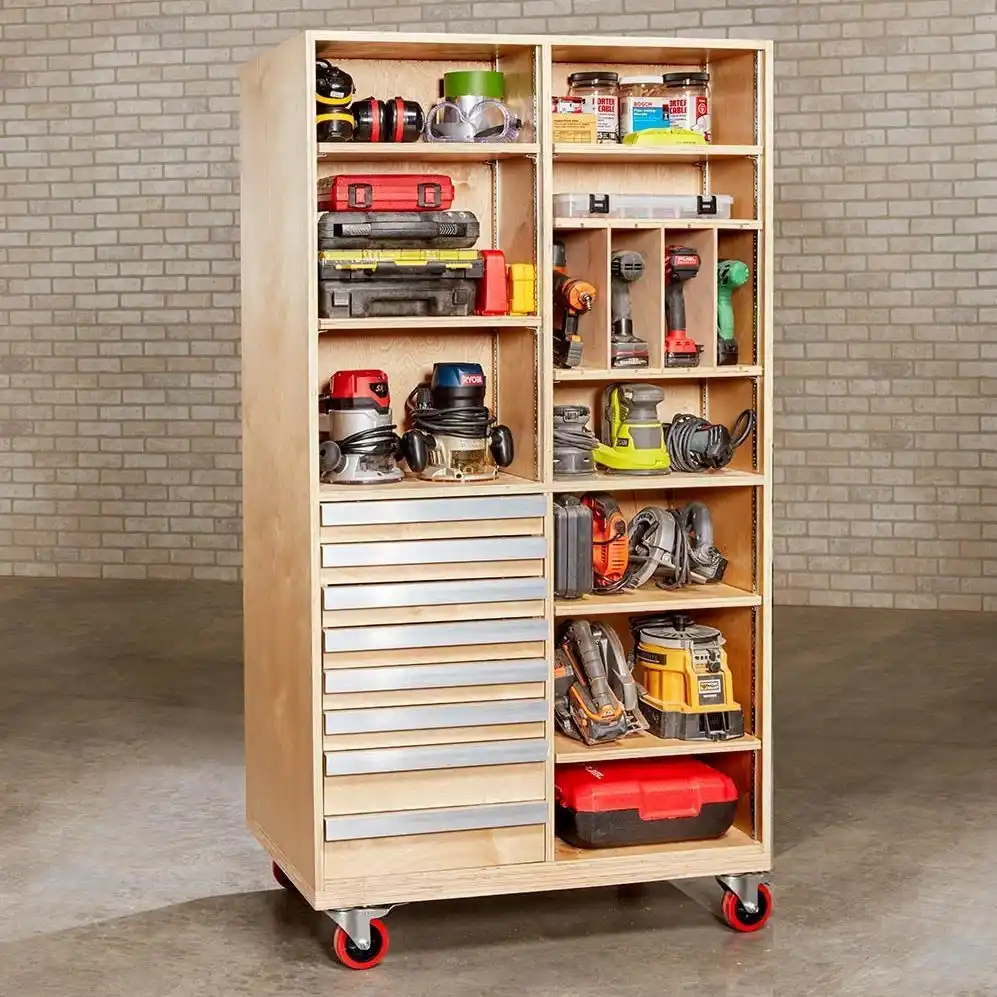
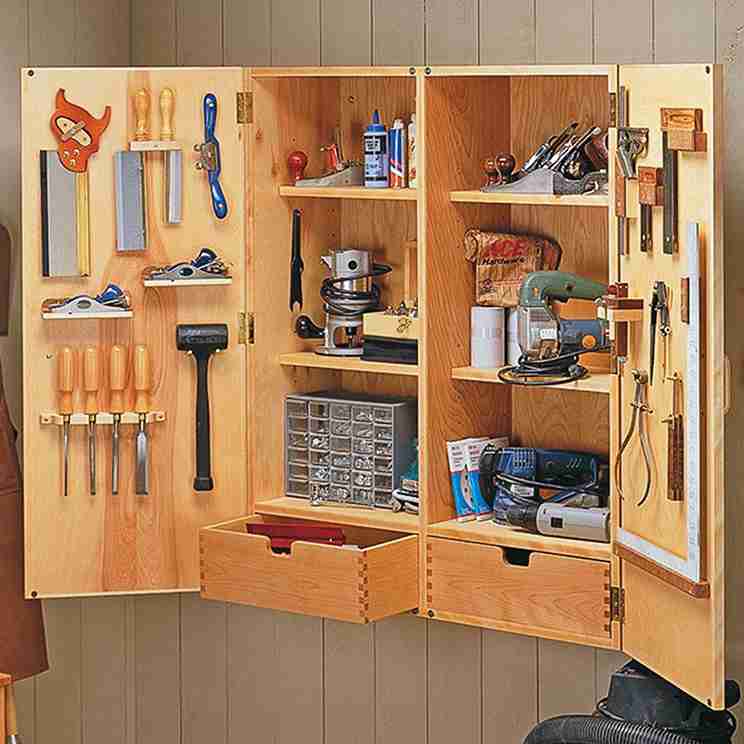
18. Tool Storage Cabinet with Drawers

A dedicated tool storage cabinet can be a lifesaver, especially if you have a large collection of tools. Cabinets with drawers provide separate spaces for different tools, reducing clutter and helping you stay organized.
How to Make It:
Start by selecting or building a wooden cabinet with multiple drawers. Each drawer can be designated for a specific type of tool, such as wrenches, screwdrivers, or tape measures. You can even build small dividers inside the drawers to keep everything in its place.
For added organization, consider using clear plastic bins inside the drawers for smaller tools. Customize the cabinet with a coat of paint or even add a lock to keep your tools safe from curious hands.
19. Repurposed Wooden Ladder for Tool Storage

An old wooden ladder can be transformed into a charming tool storage solution. This idea works particularly well in garages or sheds that have a rustic vibe.
How to Make It:
Start by cleaning up your old ladder and giving it a fresh coat of paint or stain. Then, hang the ladder vertically or horizontally on the wall. You can use the rungs of the ladder to hang tools, place small baskets on the steps, or add hooks for extra storage.
This DIY tool organizer combines both style and functionality, and it’s a great way to repurpose something you already have while creating a beautiful and practical storage solution.
20. Over-the-Door Tool Organizer
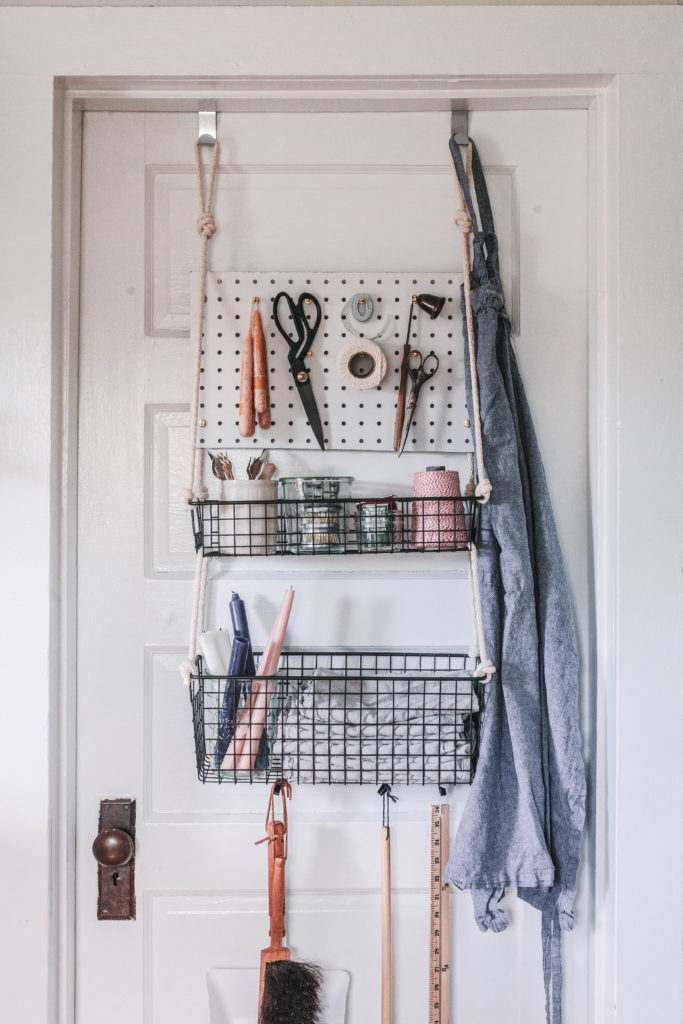
If you’re tight on space, consider using an over-the-door organizer to store your tools. This clever idea works well for smaller spaces like closets or bathrooms where you can’t spare a lot of wall or floor space.
How to Make It:
Find an over-the-door organizer with pockets, or create your own by hanging a set of baskets or bins on a strong door hook. Use each pocket or bin to store a specific type of tool, such as screwdrivers, tape measures, or pliers. The best part is that your tools remain visible and easy to access without taking up valuable space.
21. Tool Bench with Built-in Storage

For those looking to combine storage with a dedicated workspace, a tool bench with built-in storage is an ideal DIY solution. This combination ensures that your tools are organized, while providing a sturdy surface to work on projects.
How to Make It:
Start by building or repurposing a sturdy workbench. Add storage underneath with shelves or drawers for easy access to tools. For added organization, consider incorporating a pegboard on the back of the bench or building compartments into the tabletop for smaller tools.
This project is more advanced, but it’s well worth the effort if you regularly use tools for DIY projects. It ensures that everything has a place while providing a functional workspace that will serve you well for years to come.
Conclusion: Organize Your Tools, Enhance Your Creativity!
Keeping your tools organized doesn’t just make your space look better—it also helps you stay more efficient and productive. With these 21 tool storage DIY ideas, you now have a wide range of creative solutions that cater to different needs, spaces, and preferences.
Whether you’re looking for budget-friendly options like repurposed jars and clotheslines, or you prefer something more permanent like a tool bench with built-in storage, there’s something here for everyone. Remember, the key is to choose a storage solution that fits your tools, space, and lifestyle.
Now, it’s time to roll up your sleeves and start tackling that clutter! Which tool storage DIY idea are you excited to try first? Let us know in the comments or share your own tips for staying organized—happy organizing!