How to Fix a Toilet That’s Leaking From the Tank
A toilet leaking from the tank is one of those problems that feels urgent but is often easier to fix than most people expect.
Whether you notice water pooling around the base, hear constant running water, or see your water bill creeping up, the issue usually comes down to a worn internal component. In most cases, you can fix it yourself with basic tools and replacement parts that cost under $100.
This guide walks you through identifying the cause and repairing it step by step.
Project Overview
Working Time: 1 to 2 hours
Total Time: 2 to 4 hours
Skill Level: Beginner
Estimated Cost: $50 to $100
Tools You’ll Need
- Sponge
- Bucket
- Towels
- Channel lock pliers
- Flathead screwdriver
- Pipe wrench
Materials You May Need
- Flush valve assembly
- Fill valve assembly
- Tank-to-bowl bolt gaskets
- Tank-to-bowl gasket
- Replacement toilet tank if cracked
Not every repair requires all of these parts. First, identify the source of the leak.
Step 1: Identify Where the Leak Is Coming From
Before replacing anything, you need to confirm the problem area.
Turn Off the Water
Locate the shutoff valve behind the toilet near the floor. Turn it clockwise to stop the water supply.
Mark the Water Level
Use a marker to mark the current water level inside the tank. Then add a few drops of food coloring to the tank water and wait five to ten minutes.
Now check the toilet bowl and surrounding floor.
What the Results Mean
If colored water appears in the bowl, the flush valve is leaking.
If the toilet keeps running but the water level remains stable, the fill valve may be faulty.
If water is pooling around the toilet base after flushing, worn tank gaskets are likely the cause.
If you see a visible crack in the porcelain tank, the tank must be replaced.
Once you know the source, follow the correct repair below.
How to Replace the Flush Valve
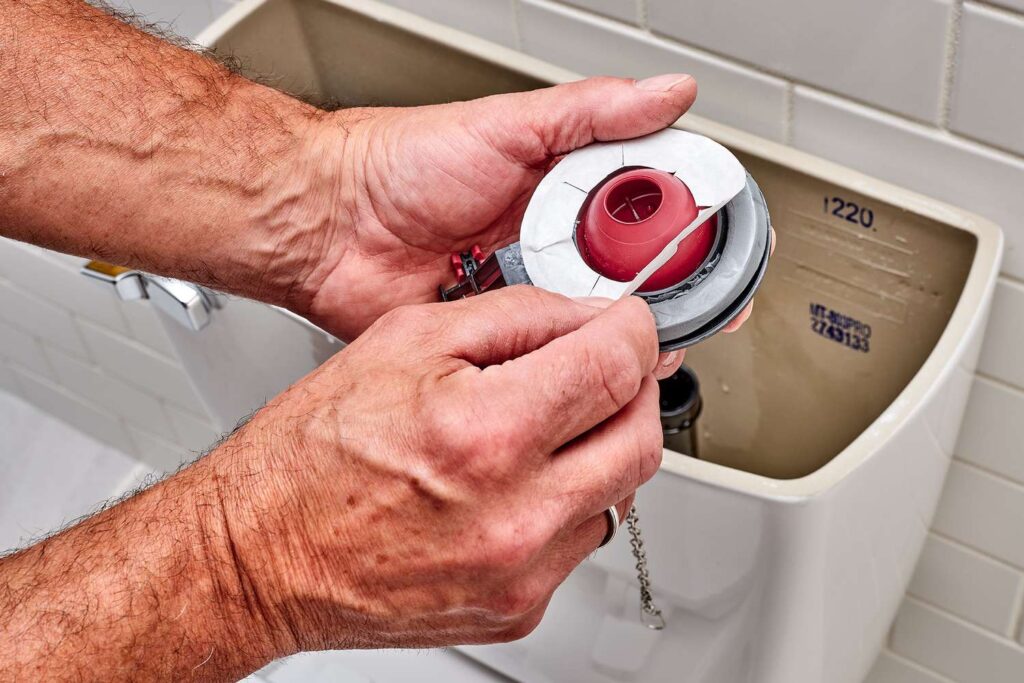
The flush valve allows water to move from the tank into the bowl. Over time, it can warp or deteriorate, causing slow leaks.
- Turn off the water supply.
- Flush the toilet to empty the tank.
- Use a sponge to remove any remaining water.
- Disconnect the water supply line.
- Remove the tank-to-bowl bolts and carefully lift the tank off.
- Place the tank upside down on a towel.
- Remove the old flush valve assembly.
- Install the new flush valve according to the manufacturer’s instructions.
- Replace the large tank-to-bowl gasket.
- Reinstall the tank and tighten bolts evenly.
- Reconnect the water supply and test for leaks.
Always tighten bolts gradually and evenly to avoid cracking the porcelain.
How to Replace the Fill Valve
The fill valve controls incoming water. If it fails, water may overflow into the overflow tube or leak from the base of the tank.
- Turn off the water supply.
- Flush and remove excess water.
- Disconnect the supply line.
- Loosen the locknut underneath the tank.
- Remove the old fill valve from inside the tank.
- Insert the new fill valve and adjust its height.
- Tighten the locknut securely but avoid overtightening.
- Reconnect the supply line.
- Turn the water back on and check for leaks.
Ensure the water level stops about one inch below the top of the overflow tube.
How to Replace Tank Gaskets
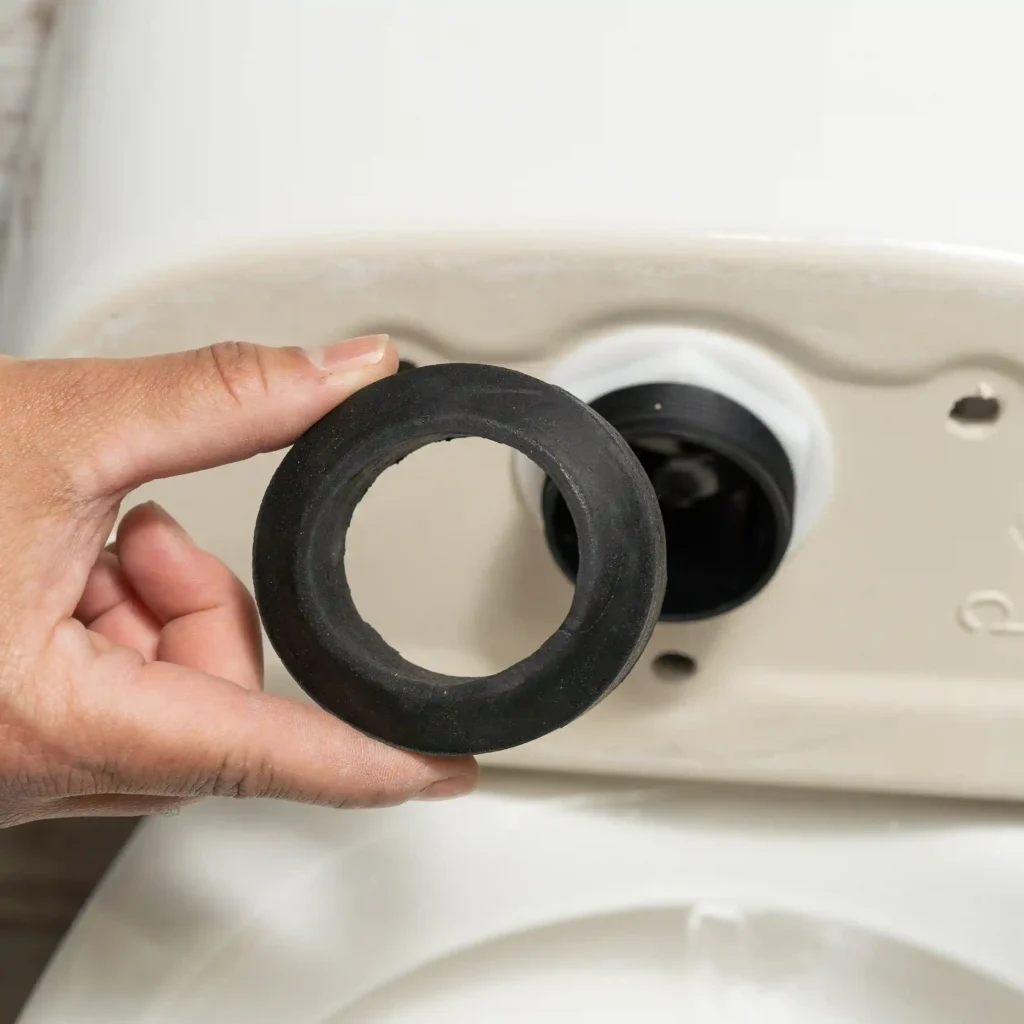
There are typically three gaskets that prevent leaks:
- Two bolt gaskets
- One large tank-to-bowl gasket
If water leaks onto the floor when you flush, these gaskets may be worn or compressed.
- Turn off the water supply.
- Flush and remove remaining water.
- Disconnect the tank from the bowl.
- Replace the bolt gaskets and washers.
- Replace the large tank-to-bowl gasket.
- Reinstall the tank carefully and tighten evenly.
- Restore water supply and test.
Replacing all gaskets at once prevents repeat repairs.
How to Replace a Cracked Toilet Tank
If you see a visible crack in the porcelain, replacement is the only reliable solution.
- Turn off the water supply.
- Drain the tank.
- Disconnect the supply line.
- Remove tank bolts and lift the tank off.
- Transfer the fill and flush valve assemblies to the new tank if reusable.
- Install new gaskets as needed.
- Mount the new tank securely.
- Reconnect the water and test thoroughly.
Temporary sealants are not long-term solutions for porcelain cracks.
Common Causes Of Toilet Tank Leaks
Faulty flush valve
When the flush valve no longer seals properly, water slowly leaks from the tank into the bowl. This often shows up as constant running or unexplained water loss.
Faulty fill valve
A failing fill valve does not shut off correctly, causing water to continue flowing or overflow into the overflow tube. This can lead to ongoing water use and occasional leaks.
Worn gaskets
Gaskets lose elasticity as they age. Once compressed or hardened, they can no longer create a watertight seal, allowing water to escape around bolts or between the tank and bowl.
Cracked tank
Any visible crack in the porcelain is a structural failure. Temporary fixes are unreliable, and the only safe solution is replacing the tank.
When to Call a Professional
Call a plumber if:
- The shutoff valve does not work
- The leak persists after part replacement
- The tank feels unstable
- You notice subfloor damage
Most tank leaks are manageable for homeowners, but persistent issues may require professional diagnosis.
Frequently Asked Questions
Why is my toilet tank leaking only after I flush?
If the leak appears only after flushing, the issue is most likely worn tank-to-bowl bolt gaskets or the large tank-to-bowl gasket. When the tank refills and water pressure increases, weak seals allow water to escape.
Can I fix a leaking toilet tank without removing the tank?
Some minor issues, such as adjusting or replacing a fill valve, can be done without removing the tank. However, replacing flush valves or gaskets requires removing the tank for proper access and sealing.
How long do toilet tank parts typically last?
Most flush and fill valves last between 5 and 10 years, depending on water quality and usage. Hard water can shorten the lifespan of internal components.
Is a small toilet tank leak serious?
Even a slow leak can waste hundreds of gallons of water per month and potentially damage flooring. It is best to address the issue as soon as possible.
How much does it cost to fix a leaking toilet tank?
Most DIY toilet tank repairs cost between $50 and $100, depending on which part needs replacement. Common fixes like replacing a fill valve, flush valve, or gaskets typically fall within this range.
Hiring a plumber usually costs $150 to $300 or more, depending on your location, labor rates, and whether additional issues are discovered during the repair.
Final Thoughts
A leaking toilet tank may seem complicated at first, but most causes are simple mechanical issues that can be repaired with basic tools.
Start by identifying the source. Replace only the faulty component. Use new gaskets whenever the tank is removed. Tighten hardware evenly and test thoroughly before finishing.
With careful diagnosis and proper installation, you can stop the leak, protect your bathroom floor, and avoid unnecessary water waste.
Read more: